
CKYC Upload
💫 🧙♂️ One solution to create them all, one solution to find them. One solution to bring them all, and in the registry bind them.
Introduction
Decentro's CKYC Bulk Upload product is an abstraction over CKYC's Upload via a simple API. The solution lets customers seamlessly push bulk users and their documents via a single API hit.
Decentro will perform all the validations, image processing, image compression, batch building, connecting to the Financial Institution's SFTP server, and uploading the users to CKYC in the format recommended by them.
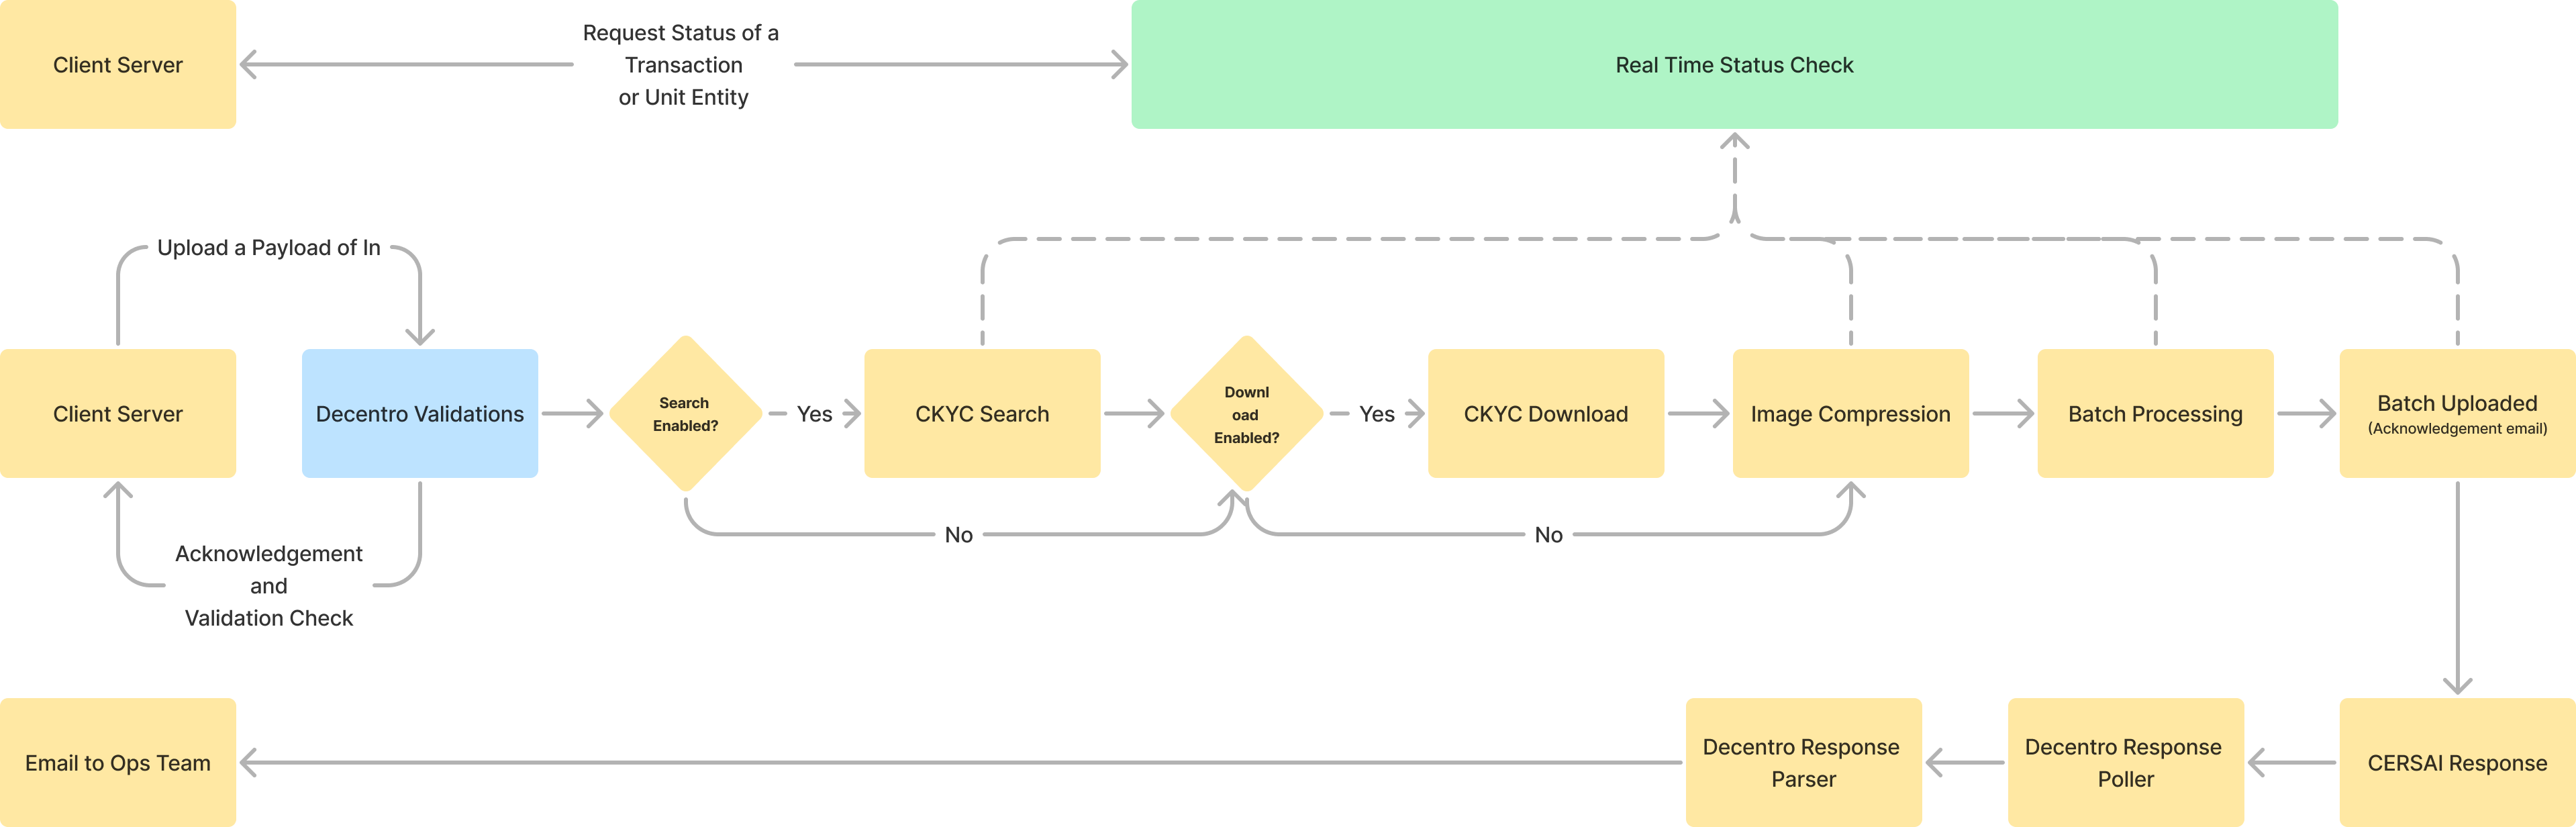
A General Flow Diagram for all flows of the CKYC Bulk Upload Solution
Additionally, Decentro will also parse all stage-wise and periodic response files from CKYC. We will send you an email whenever an upload is pending on the CKYC portal, after which you are expected to approve the upload checker of the batch. Decentro also sends detailed reports about approved and rejected updates from CKYC post approval from the checker.
Lastly, to add more touch points to the entire flow described above, Decentro's CKYC Bulk Upload solution also comes with status check APIs, both at the transaction level as well as the line item level (whether it's a batch of individuals or legal entities).
In short, you get to combine the best of both worlds, with the simplicity of an API interface and the stability of an SFTP connection.
Decentro handles the SFTP connection in the backend so that you don't have to worry about pushing and polling files from SFTP, and does all the heavy lifting required to parse the API request payload into CKYC's format.
This documentation is geared towards members of business and product teams and gives you a gist on how to get started with the CKYC Upload solution, steps to take post-go-live, and frequently asked questions.
Product Flow
The CKYC Upload API for individuals and legal entities is segregated into 5 high-level flows that the batch processor takes while attempting to create a CKYC Record. The five flows are as follows:
- A recent KYC record is pushed with a CKYC ID
- An older KYC record is pushed with a CKYC ID
- A new KYC record is pushed without a CKYC ID
- A recent KYC record is pushed without a CKYC ID
- An older KYC record is pushed without a CKYC ID
The following diagram shows the high-level segregation of the product flows.
Case 1: A recent KYC record is pushed with a CKYC ID
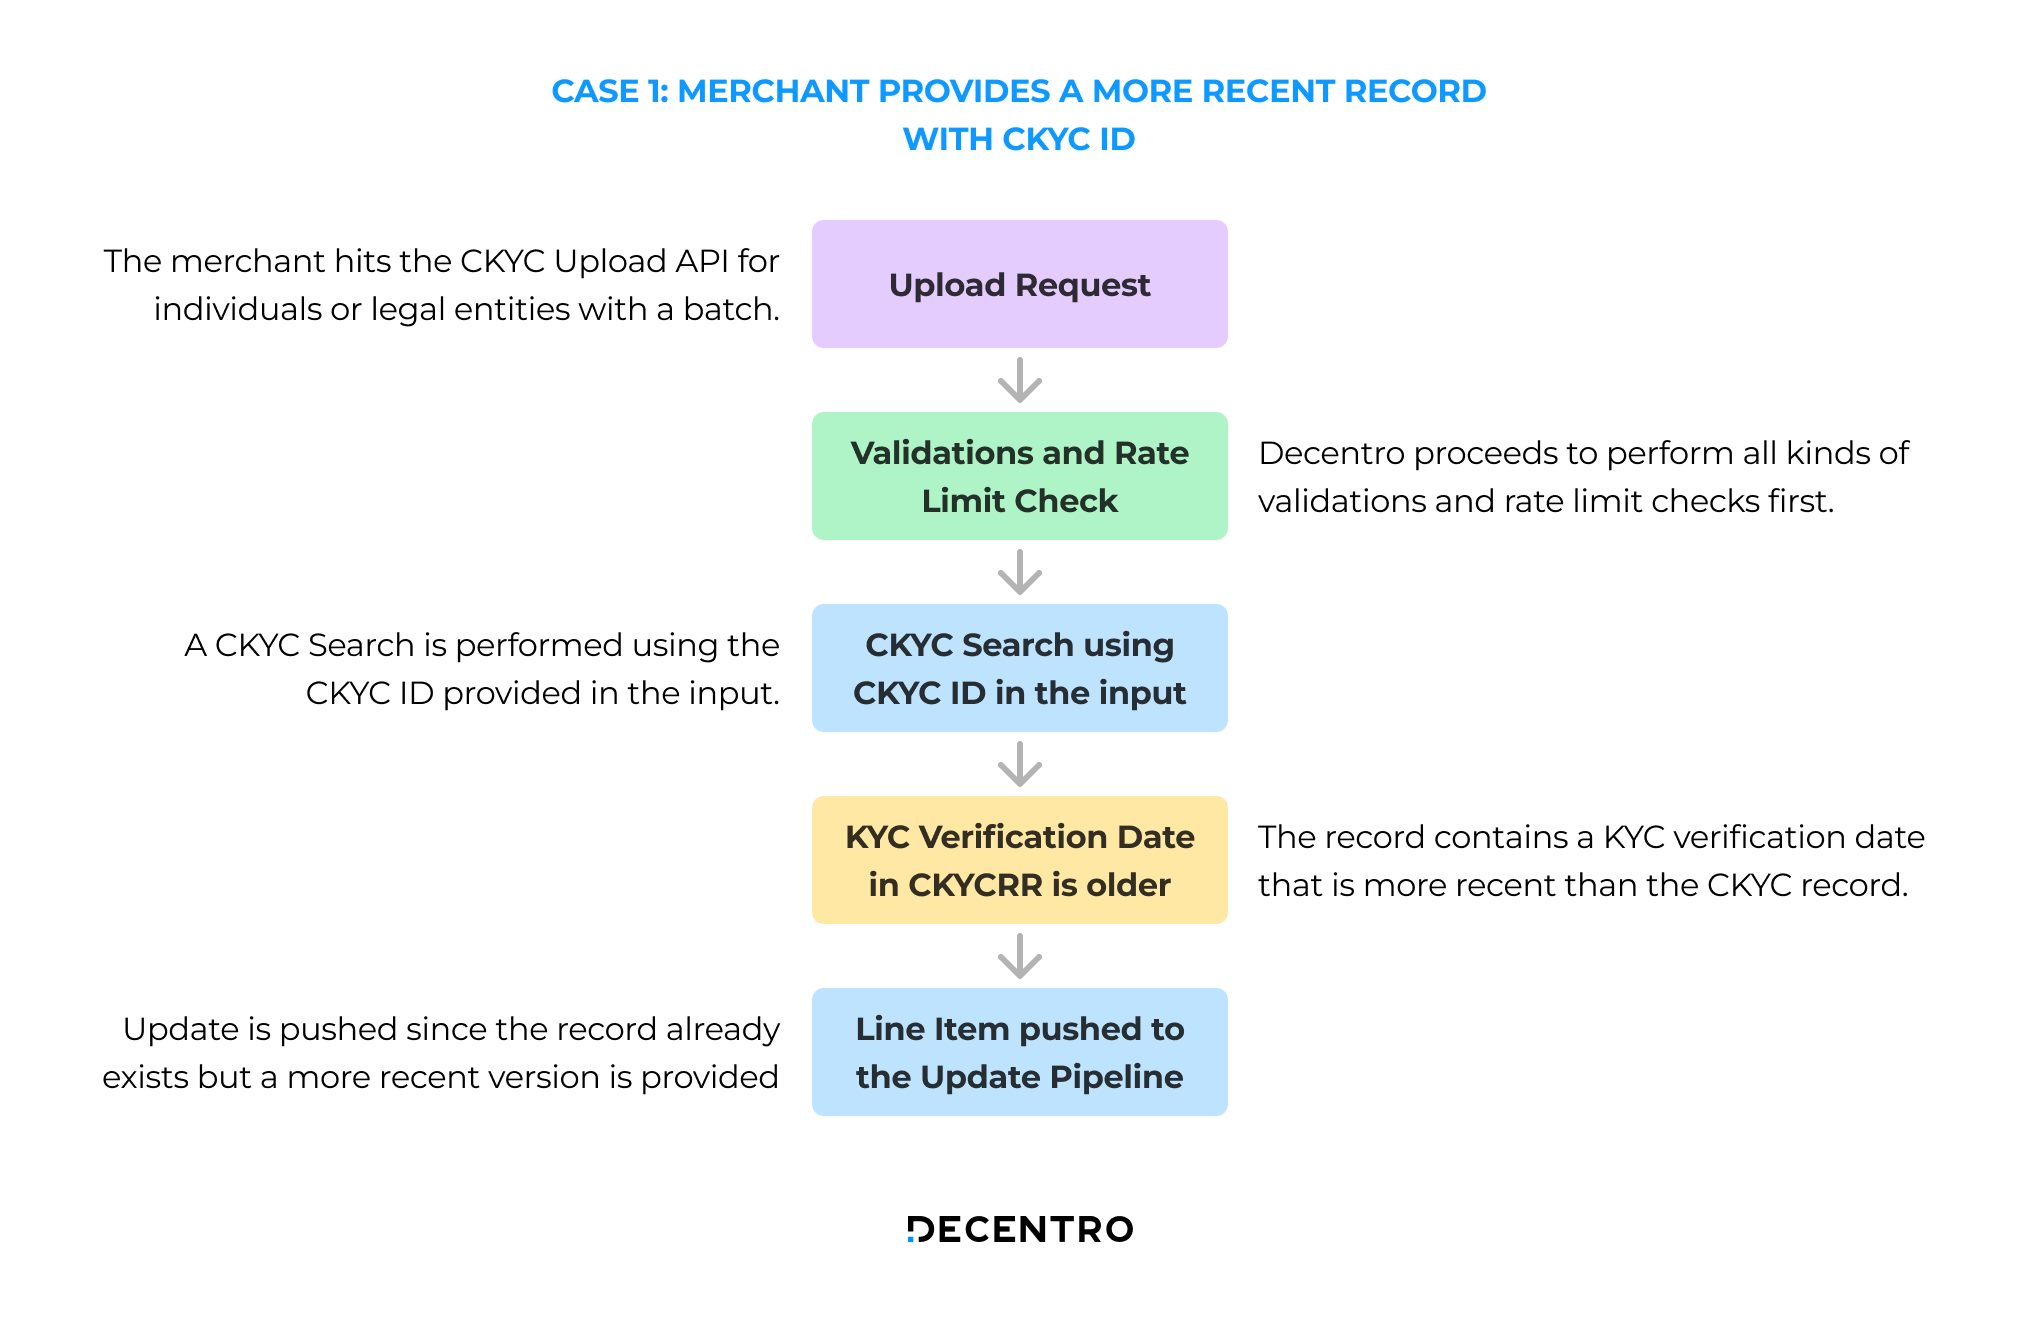
The flow for a recent KYC record pushed with a CKYC ID is as follows:
- The merchant hits the CKYC Upload API for individuals or legal entities with a batch of line items.
- Decentro proceeds to perform validations and rate limit checks.
- A CKYC search is performed using the CKYC ID provided in the input.
- The record contains a KYC verification date that is more recent than the CKYC record.
- The record contains a KYC verification date that is more recent than the CKYC record.
Case 2: An older KYC Record is pushed with a CKYC ID
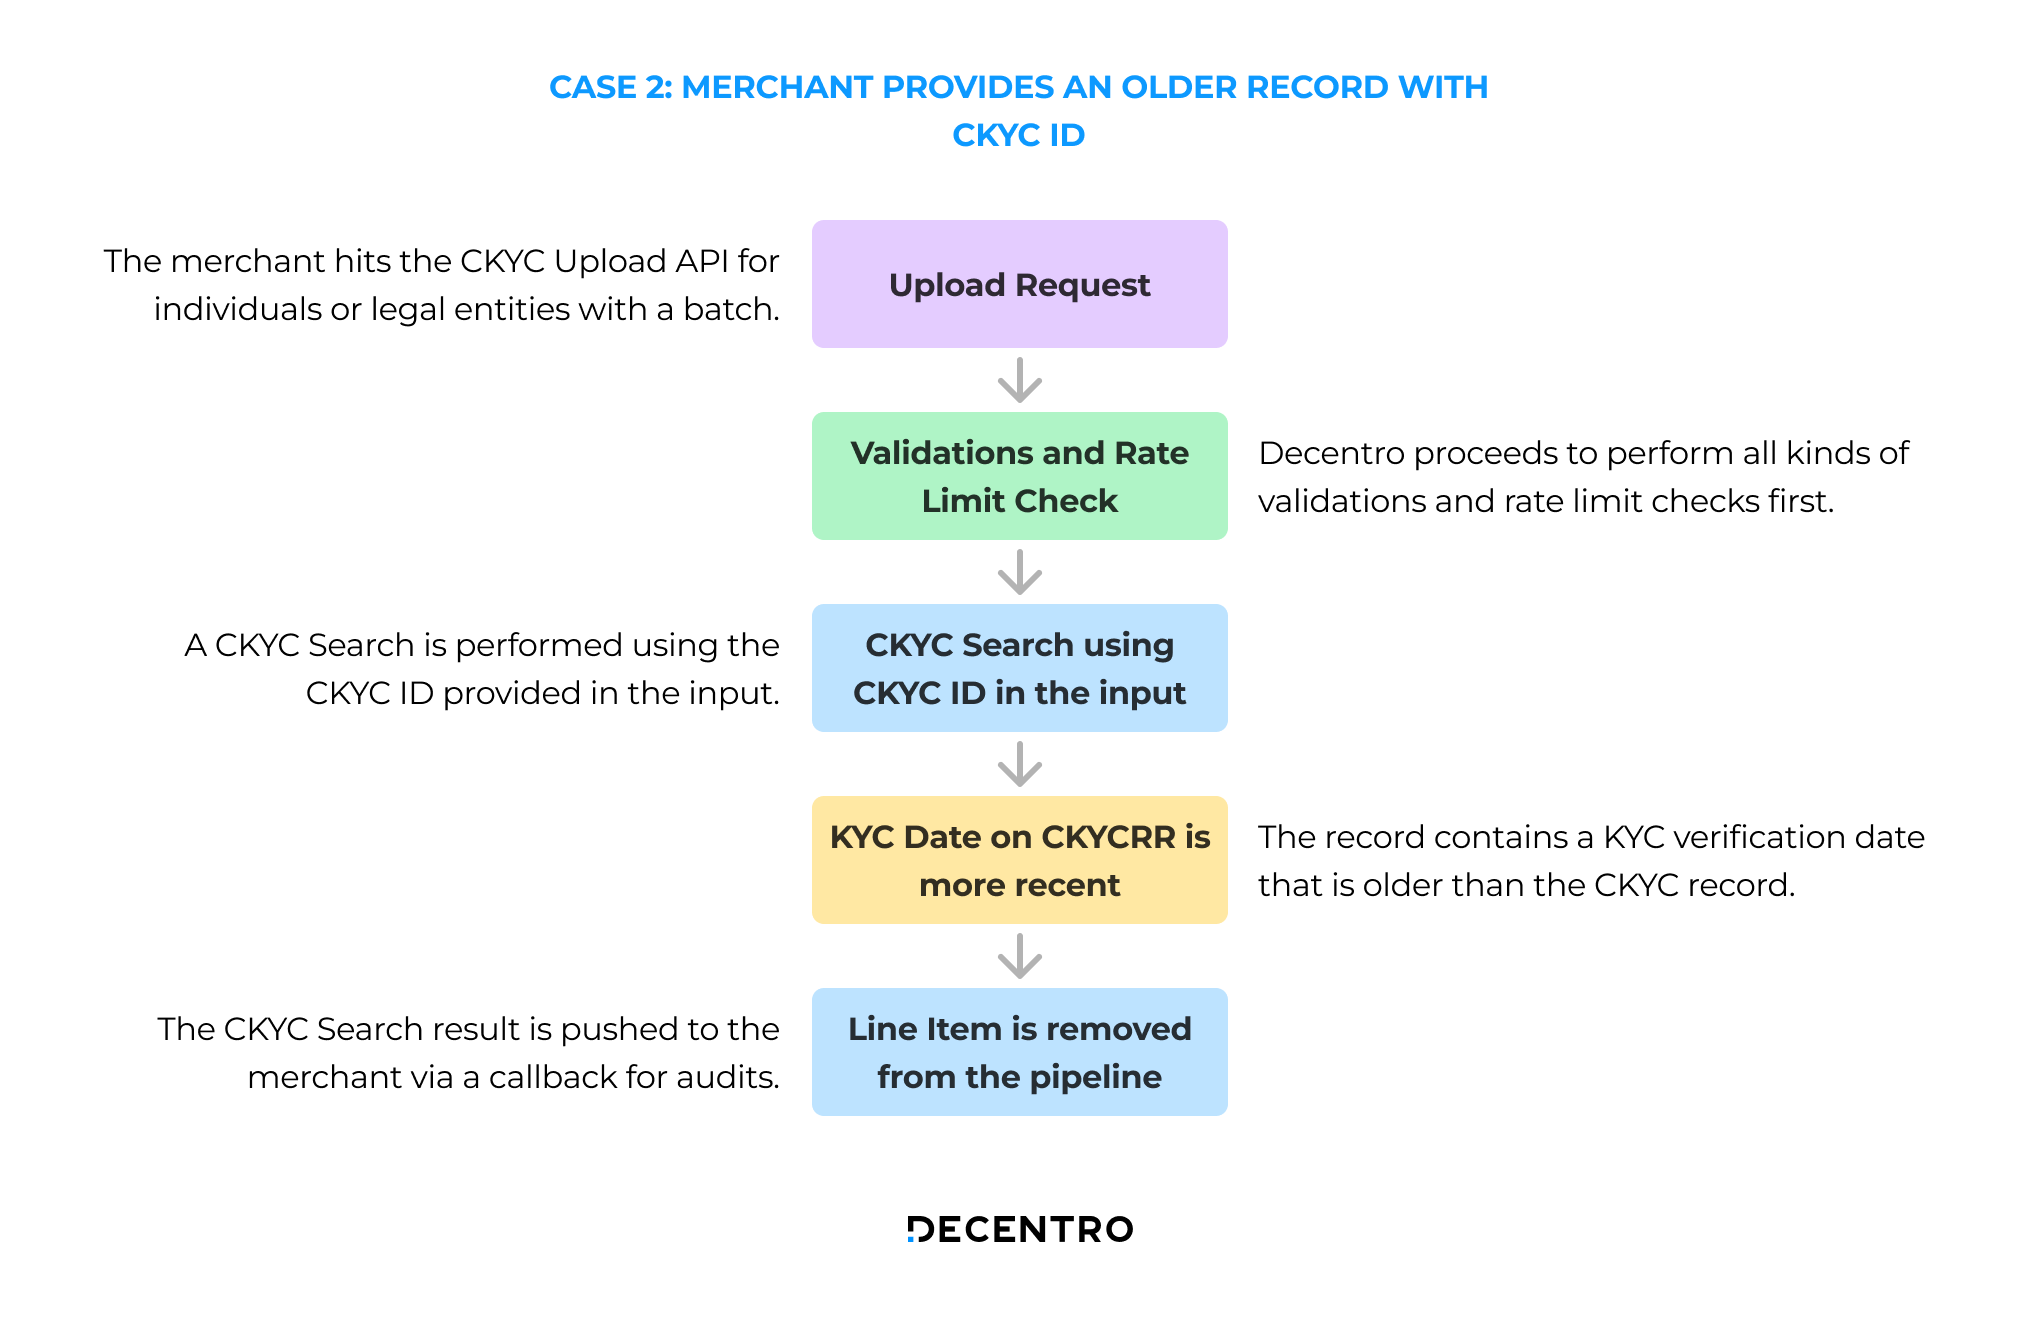
The flow for an older KYC record pushed with a CKYC ID is as follows:
- The merchant hits the CKYC Upload API for individuals or legal entities with a batch of line items.
- Decentro proceeds to perform validations and rate limit checks.
- A CKYC search is performed using the CKYC ID provided in the input.
- The record contains a KYC verification date that is older than the CKYC record.
- The CKYC Search result is pushed to the merchant via a callback for audit purposes.
Case 3: A new KYC Record is pushed without a CKYC ID
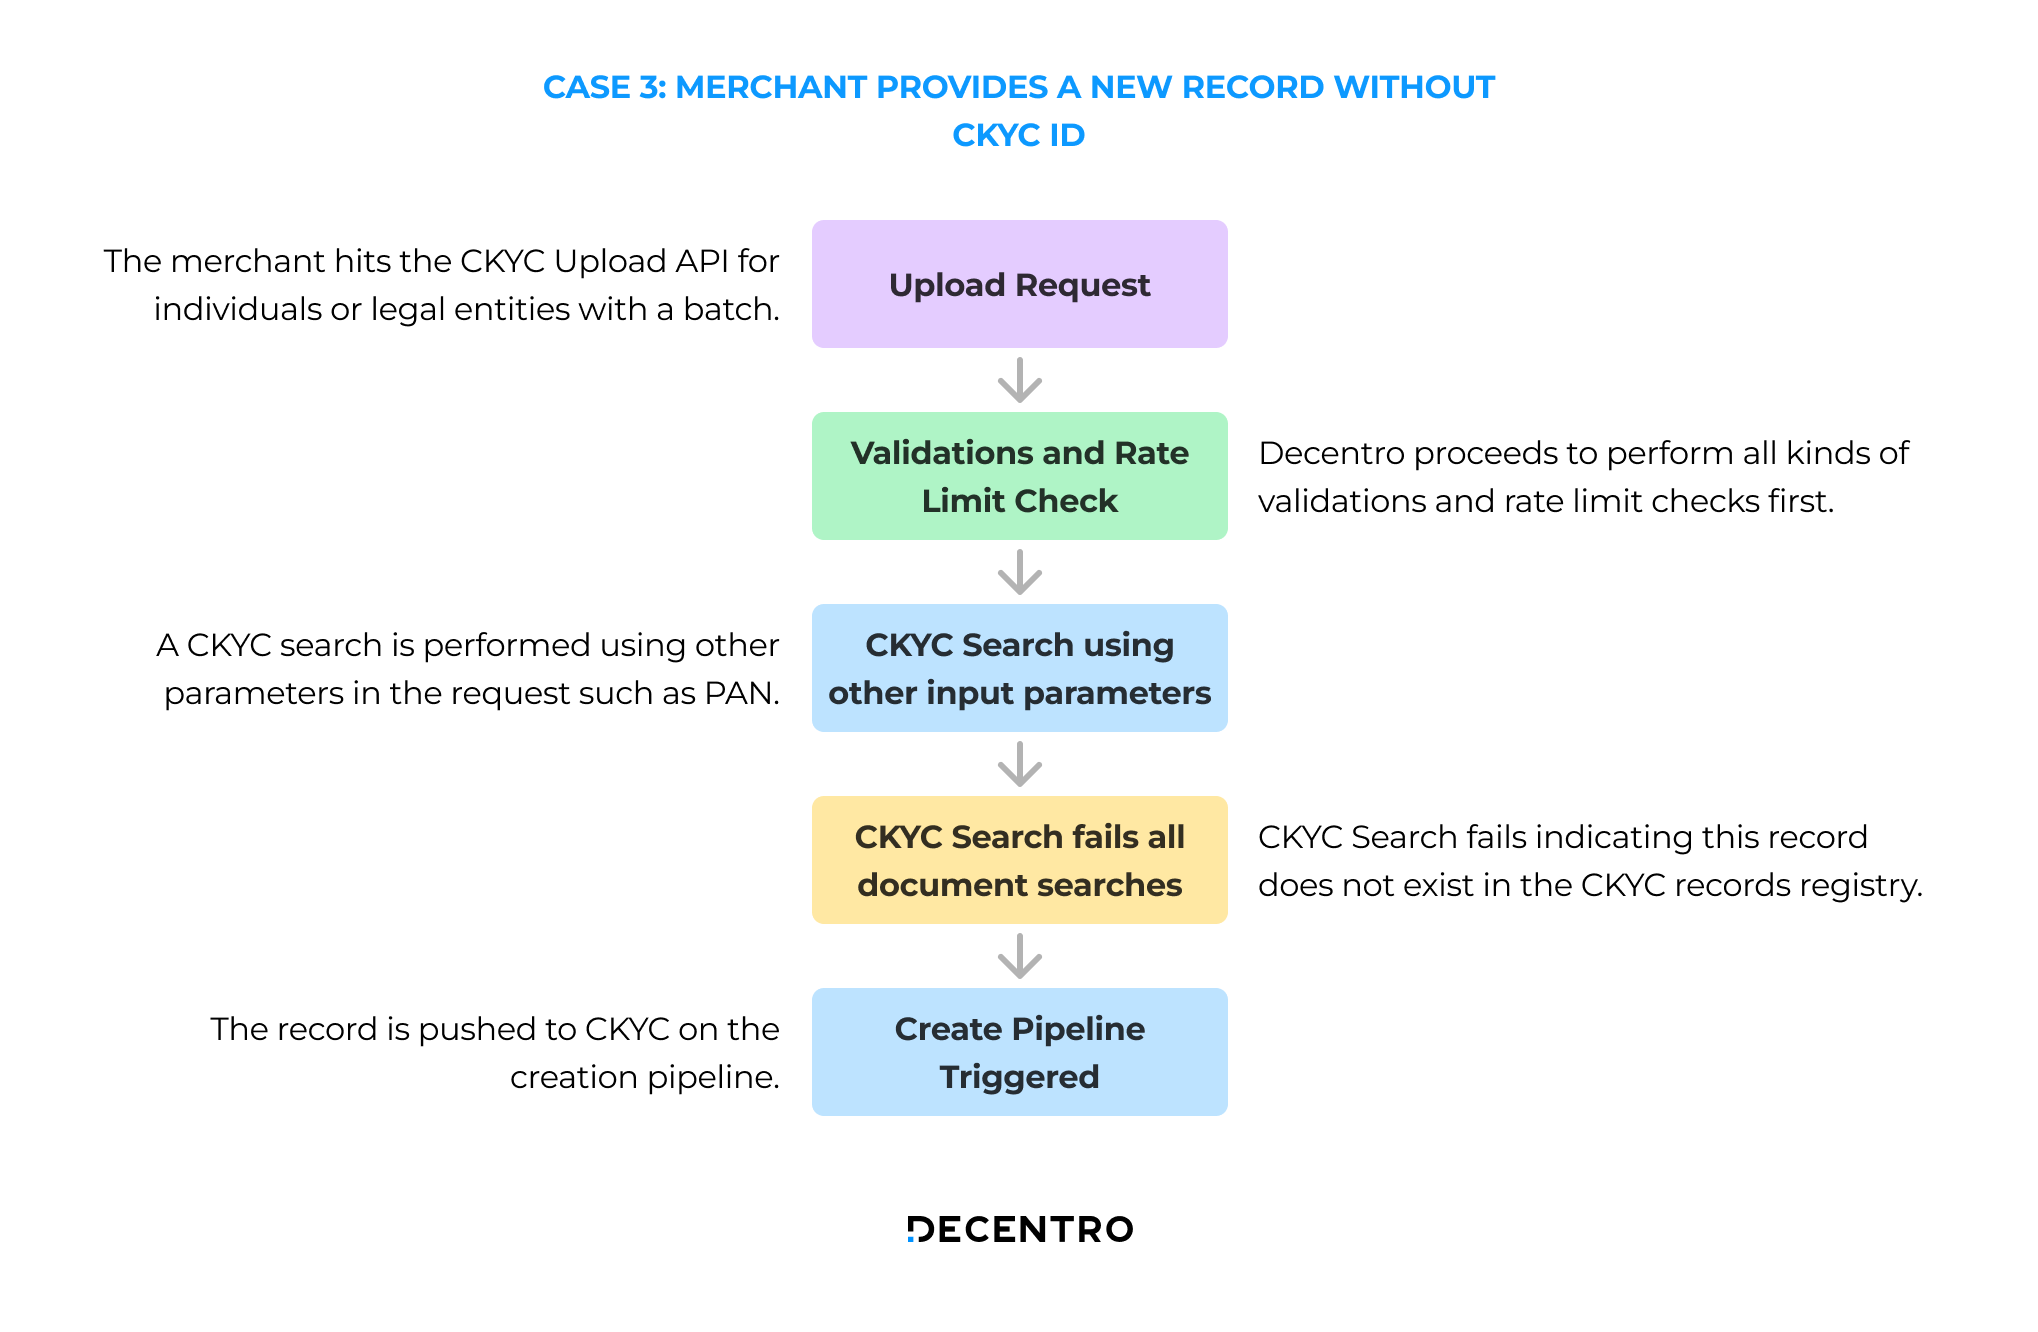
The flow for a new KYC record pushed without a CKYC ID is as follows:
- The merchant hits the CKYC Upload API for individuals or legal entities with a batch of line items.
- Decentro proceeds to perform validations and rate limit checks.
- A CKYC search is performed using other parameters in the request such as PAN/Aadhaar.
- The CKYC Search fails indicating that this record does not exist in the CKYC records registry.
- The record is pushed to CKYC on the creation pipeline.
Case 4: A recent KYC Record is pushed without a CKYC ID
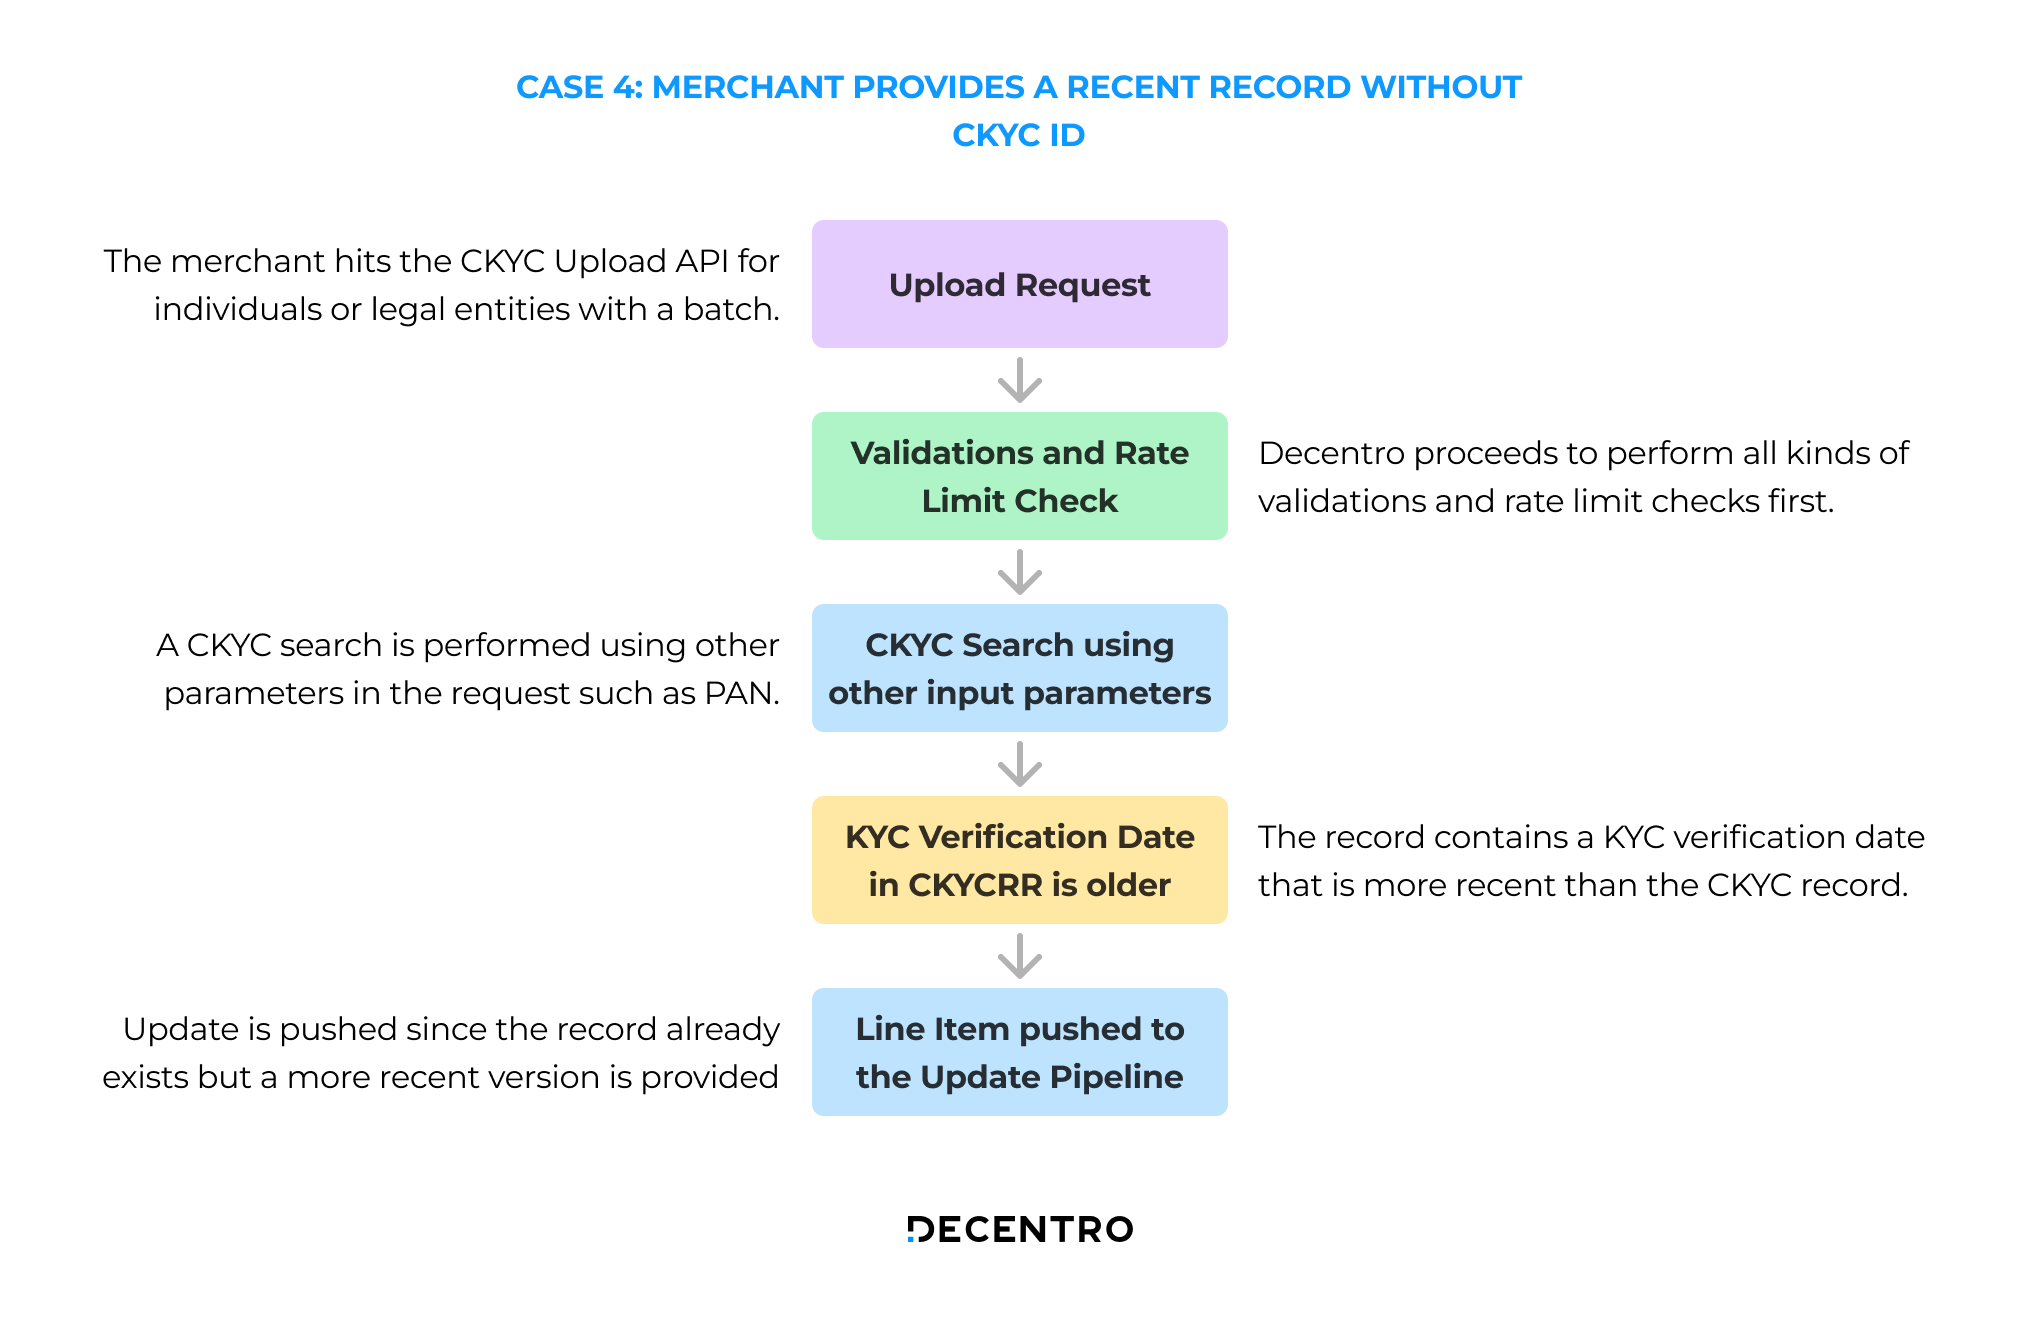
The flow for a recent KYC record pushed without a CKYC ID is as follows:
- The merchant hits the CKYC Upload API for individuals or legal entities with a batch of line items.
- Decentro proceeds to perform validations and rate limit checks.
- A CKYC search is performed using other parameters in the request such as PAN.
- The CKYC Search succeeds indicating that this record exists in the CKYC records registry.
- The record contains a KYC verification date that is more recent than the CKYC record.
- Update is pushed since the record already exists but a more recent version is provided.
Case 5: An older KYC Record is pushed without a CKYC ID
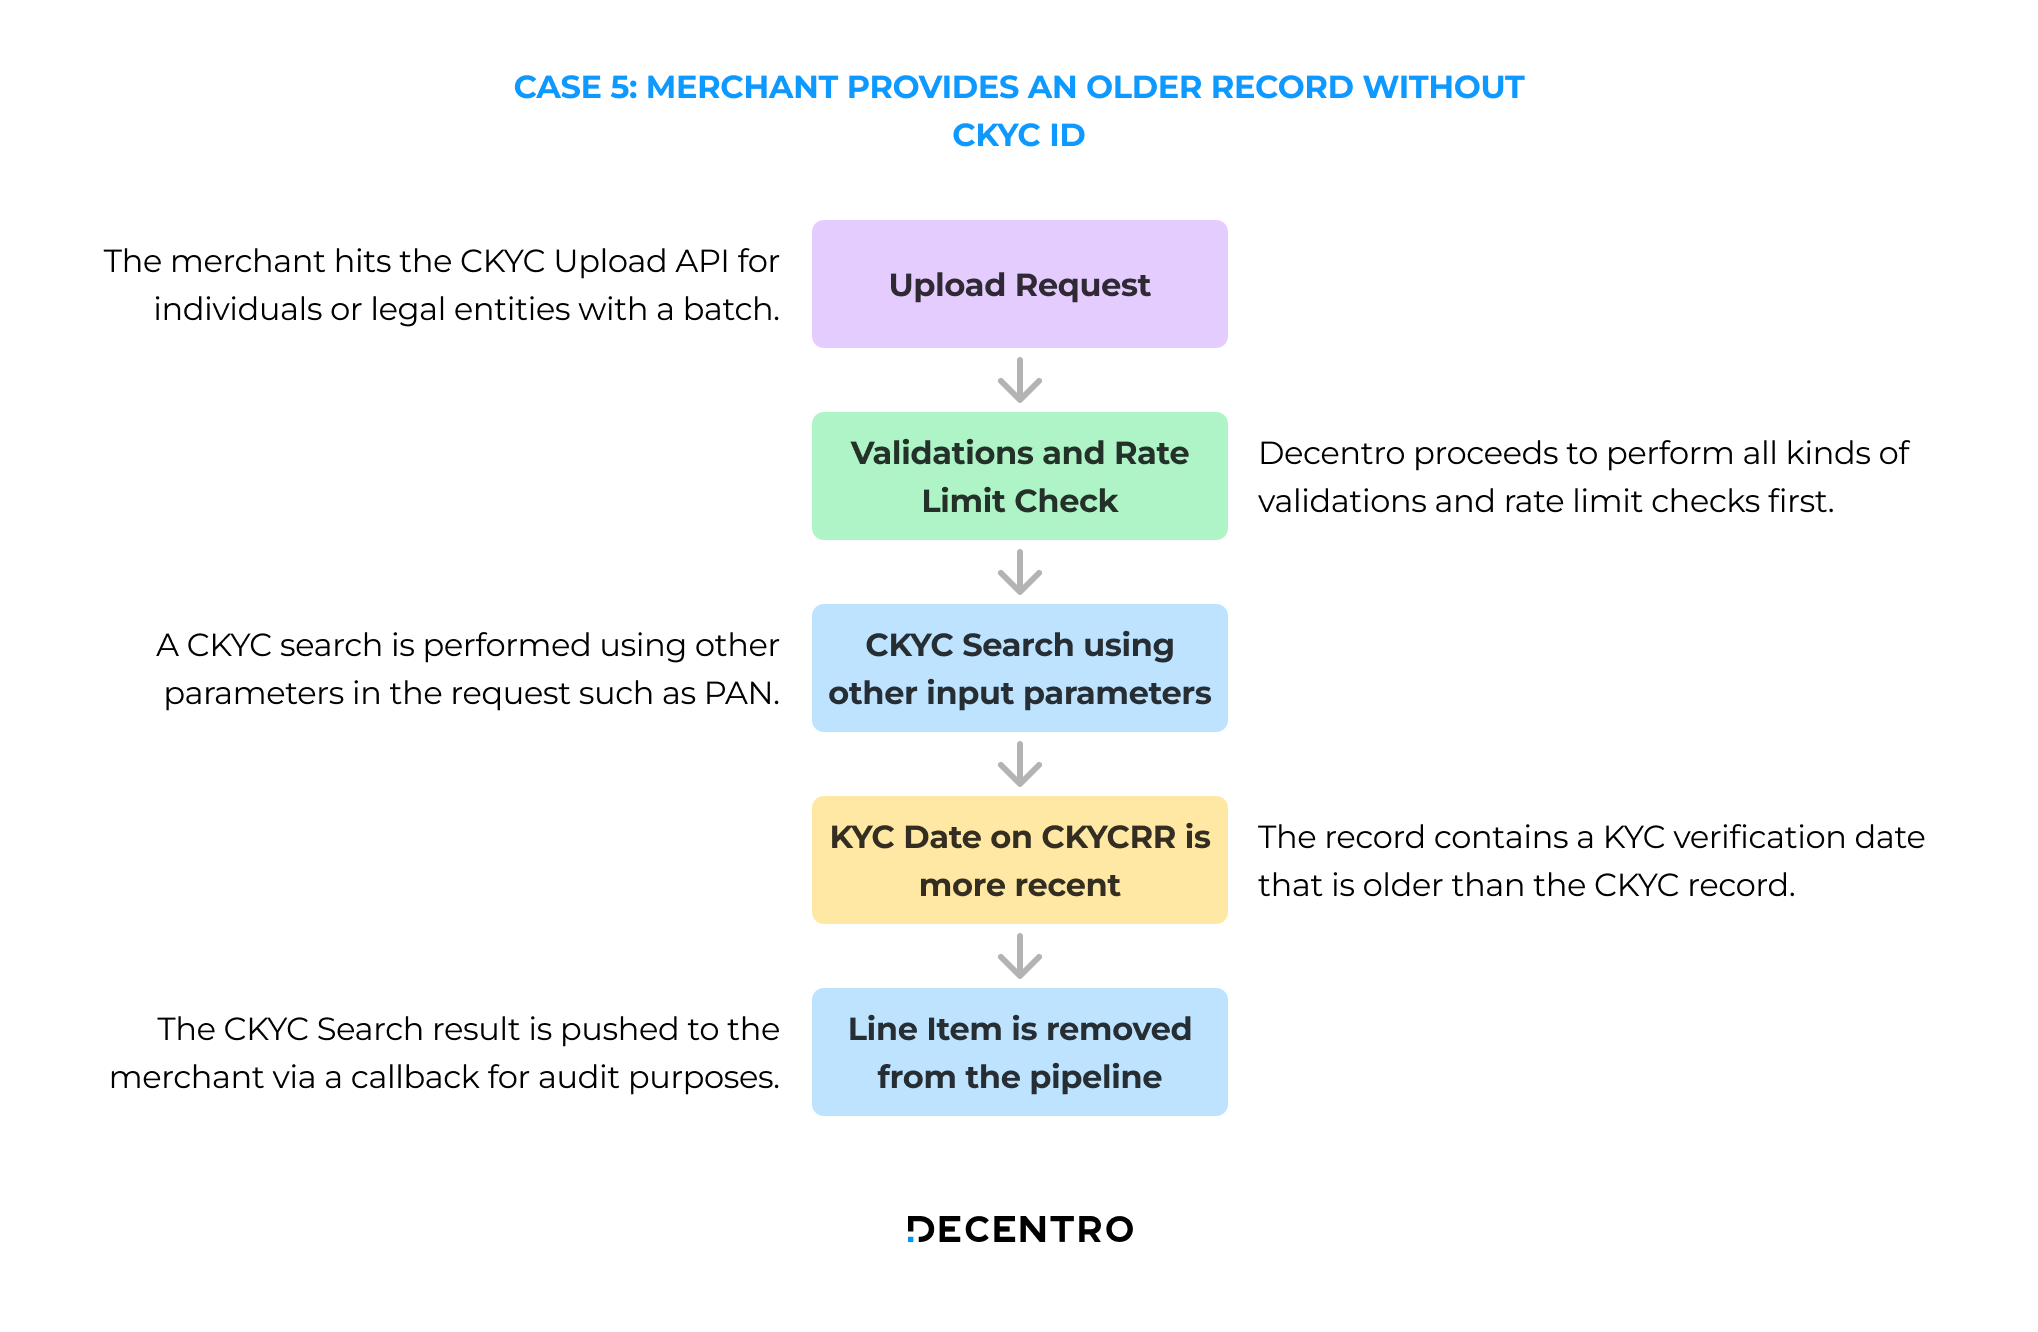
The flow for a recent KYC record pushed without a CKYC ID is as follows:
- The merchant hits the CKYC Upload API for individuals or legal entities with a batch of line items.
- Decentro proceeds to perform validations and rate limit checks.
- A CKYC search is performed using other parameters in the request such as PAN.
- The CKYC Search succeeds indicating that this record exists in the CKYC records registry.
- The record contains a KYC verification date that is older than the CKYC record.
- The CKYC Search JSON is pushed to the merchant via a callback for audit purposes.
Overall Product Flow Diagram

Please note: The above flow diagram only encapsulates those scenarios where the batch that has been pushed by the merchant to Decentro has passed all Decentro-level validations and rate limit checks. Also, the CKYC Search step is optional, to opt-out set perform_ckyc_search = false.
Integration Guide
Step 1: Get Testing Credentials
What are Testing credentials?
These are credentials provided to each platform based on their requirements and the module they opt to test out. You can access the APIs of the respective modules that you're interested in and have a discussion with our business team.
With the credentials, you can test our APIs in the same way as your live credentials and check out how our APIs provide responses on a test environment called 'Staging'. These credentials are designed to work in this environment only and production credentials will be shared separately post-closure of formalities.
How do I test the APIs?
While you are onboarded on the test environment ('Staging') by our team, you will receive the credentials for the modules you've chosen to go with. If you haven't got your testing credentials yet, you can get them by signing up here.
You'll get the below important credentials for each module that you choose -
| Name | Description |
|---|---|
| client_id | This is a unique id assigned to each client |
| client_secret | This is a client-specific password/secret_key to access the account |
| module_secret | This is a module secret that is used to access certain APIs from a module. |
| provider_secret (In some modules) | This is a provider secret that is used to access certain APIs from a module. |
Please note that the credentials are unique to a platform and should not be shared within the organization without consent or with any external partners.
2. JWT
JWT stands for JSON Web Token. It is an open standard (RFC 7519) that defines a compact and self-contained way for securely transmitting information between parties as a JSON object.
- Customers can generate JWT using our Auth API with various grant types in the request body.
- Customers can pass the grant_type as
- client_credentials
- refresh_token
- user_credentials
- The JWT token is valid for 15 minutes by default
Generate JWT with Client Credentials
Customers can generate JWT with Client Credentials -
| Request Parameter | Description |
|---|---|
| grant_type | To generate JWT with client credentials, customers need to pass grant_type as client_credentials |
| client_id | The client id generated for the customer at Decentro |
| client_secret | The client secret generated for the customer at Decentro |
Generate JWT with Refresh Token
Customers can generate JWT with Refresh Token -
| Request Parameter | Description |
|---|---|
| grant_type | To generate JWT with refresh token, customers need to pass grant_type as refresh_token |
| refresh_token | The refresh token that was generated while creating JWT |
Generate JWT with User Credentials
Customers can generate JWT with User Credentials -
| Request Parameter | Description |
|---|---|
| grant_type | To generate JWT with user credentials, customers need to pass grant_type as user_credentials |
| The email ID registered against the customer at Decentro | |
| password | The password for the dashboard is associated with the registered email ID at Decentro |
How to use JWT in Decentro APIs?
Once customers generate JWT, they can use this instead of client_id and client_secret in API Authorization.
- Customers can pass JWT in headers instead of client_id and client_secret to access the API
- All our APIs will work with both the methods, Client Credentials, and JWT
Step 2: Log in to the CKYC Portal
- You need a Windows System to log in to the CKYC Portal.
- Make sure a DSC reader utility is installed on your Windows system.
- CERSAI recommends you use the utility linked on the Downloads Page. You can access the page here.
- Please download the executable file marked under “Digital Signature Utility”
- Install the executable and restart your computer.
- To log in to the CKYC Portal, please use Edge or Opera Browser.
- CKYC Portal requires you to be logged in using Internet Explorer only.
- You can open an Edge browser session in Internet Explorer mode using the steps mentioned below:
- In the address bar for Microsoft Edge, type edge://settings/defaultbrowser and then click Enter.
- Slide the Allow sites to be reloaded in Internet Explorer toggle to ON.
- Restart Microsoft Edge.
- For more information on the above, please refer to this link.
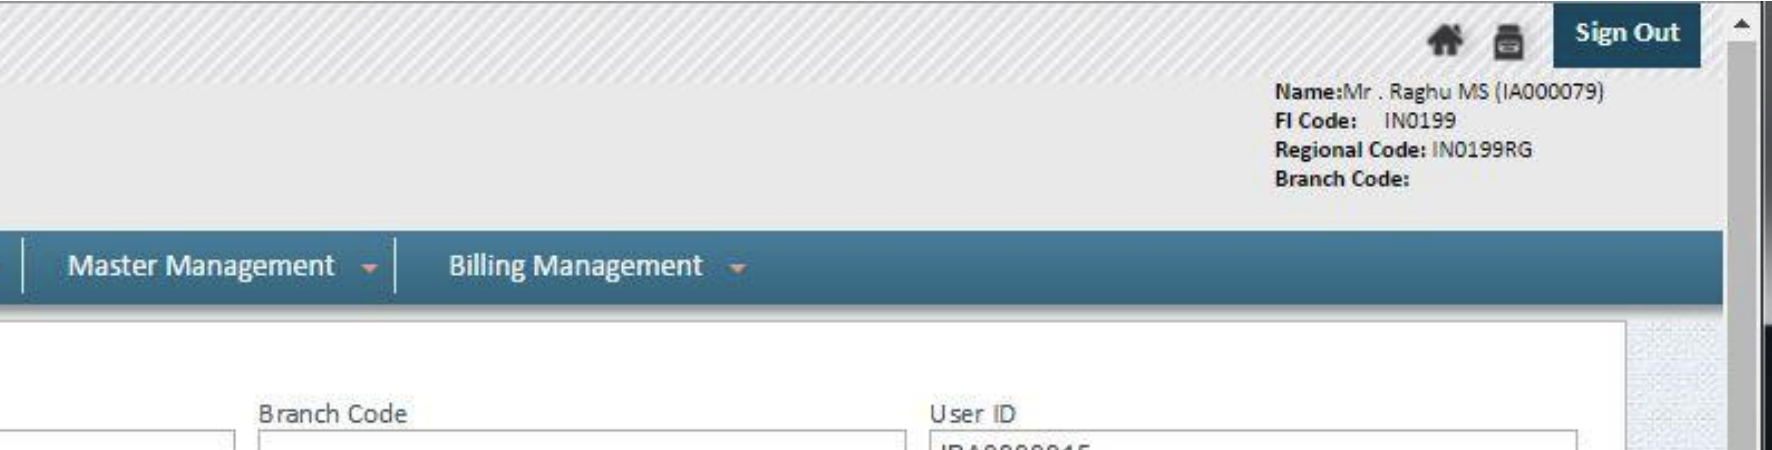
Step 3: Find your FI Code
The FI Code is found on the top right of the portal and is visible once you log in to the CKYC Portal. Please collect this code since this is important for the CKYC Upload integration.
Reference Screenshot:
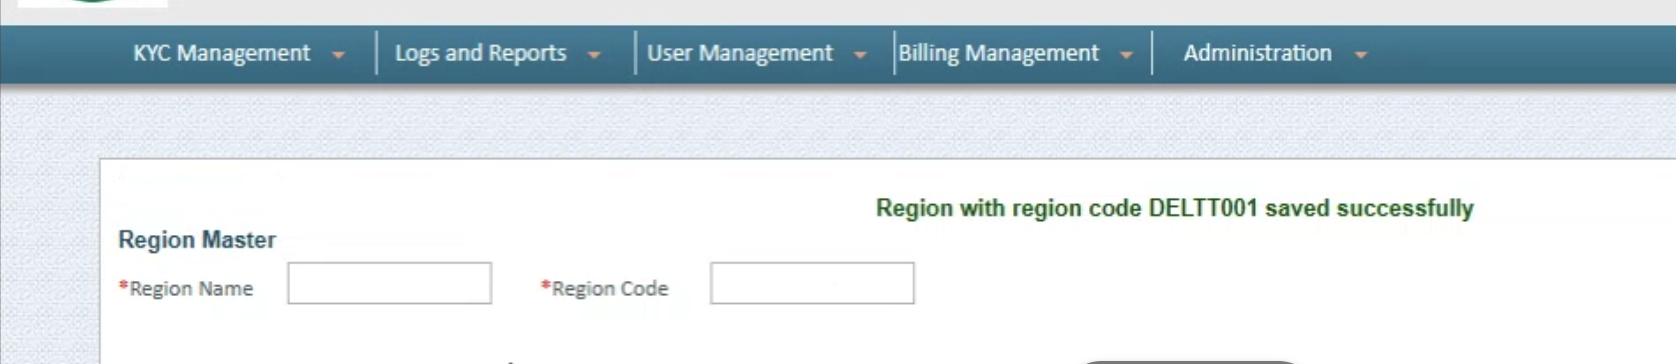
Step 4: Create the Region and Branch Code
Note: The Branch and Region codes are NOT the codes mentioned on the top right of the portal. Instead, these have to be created manually by the user. The steps are discussed below:
- First, go to the Region Master tab. Here you have to create an arbitrary Region Name and Region Code.
- Second, go to the Branch Master tab. Here you will have a dropdown list that will let you select the Region you have created in step 1.
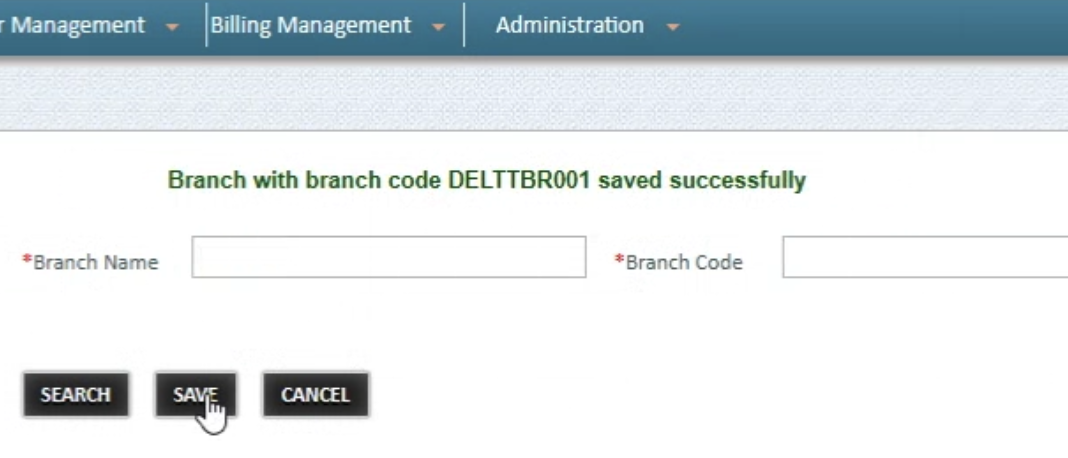
- After selecting a region, create an arbitrary Branch Name and Branch Code. Make sure these are different from the Region Name and Region Code.
Reference Screenshots:
Step 5: Enable Decentro to perform a CKYC Search
Step 1: Log in to the CKYC Portal. Go to User Management. Hover over the option and click on the "Upload Public Key" menu (Illustrative image attached)
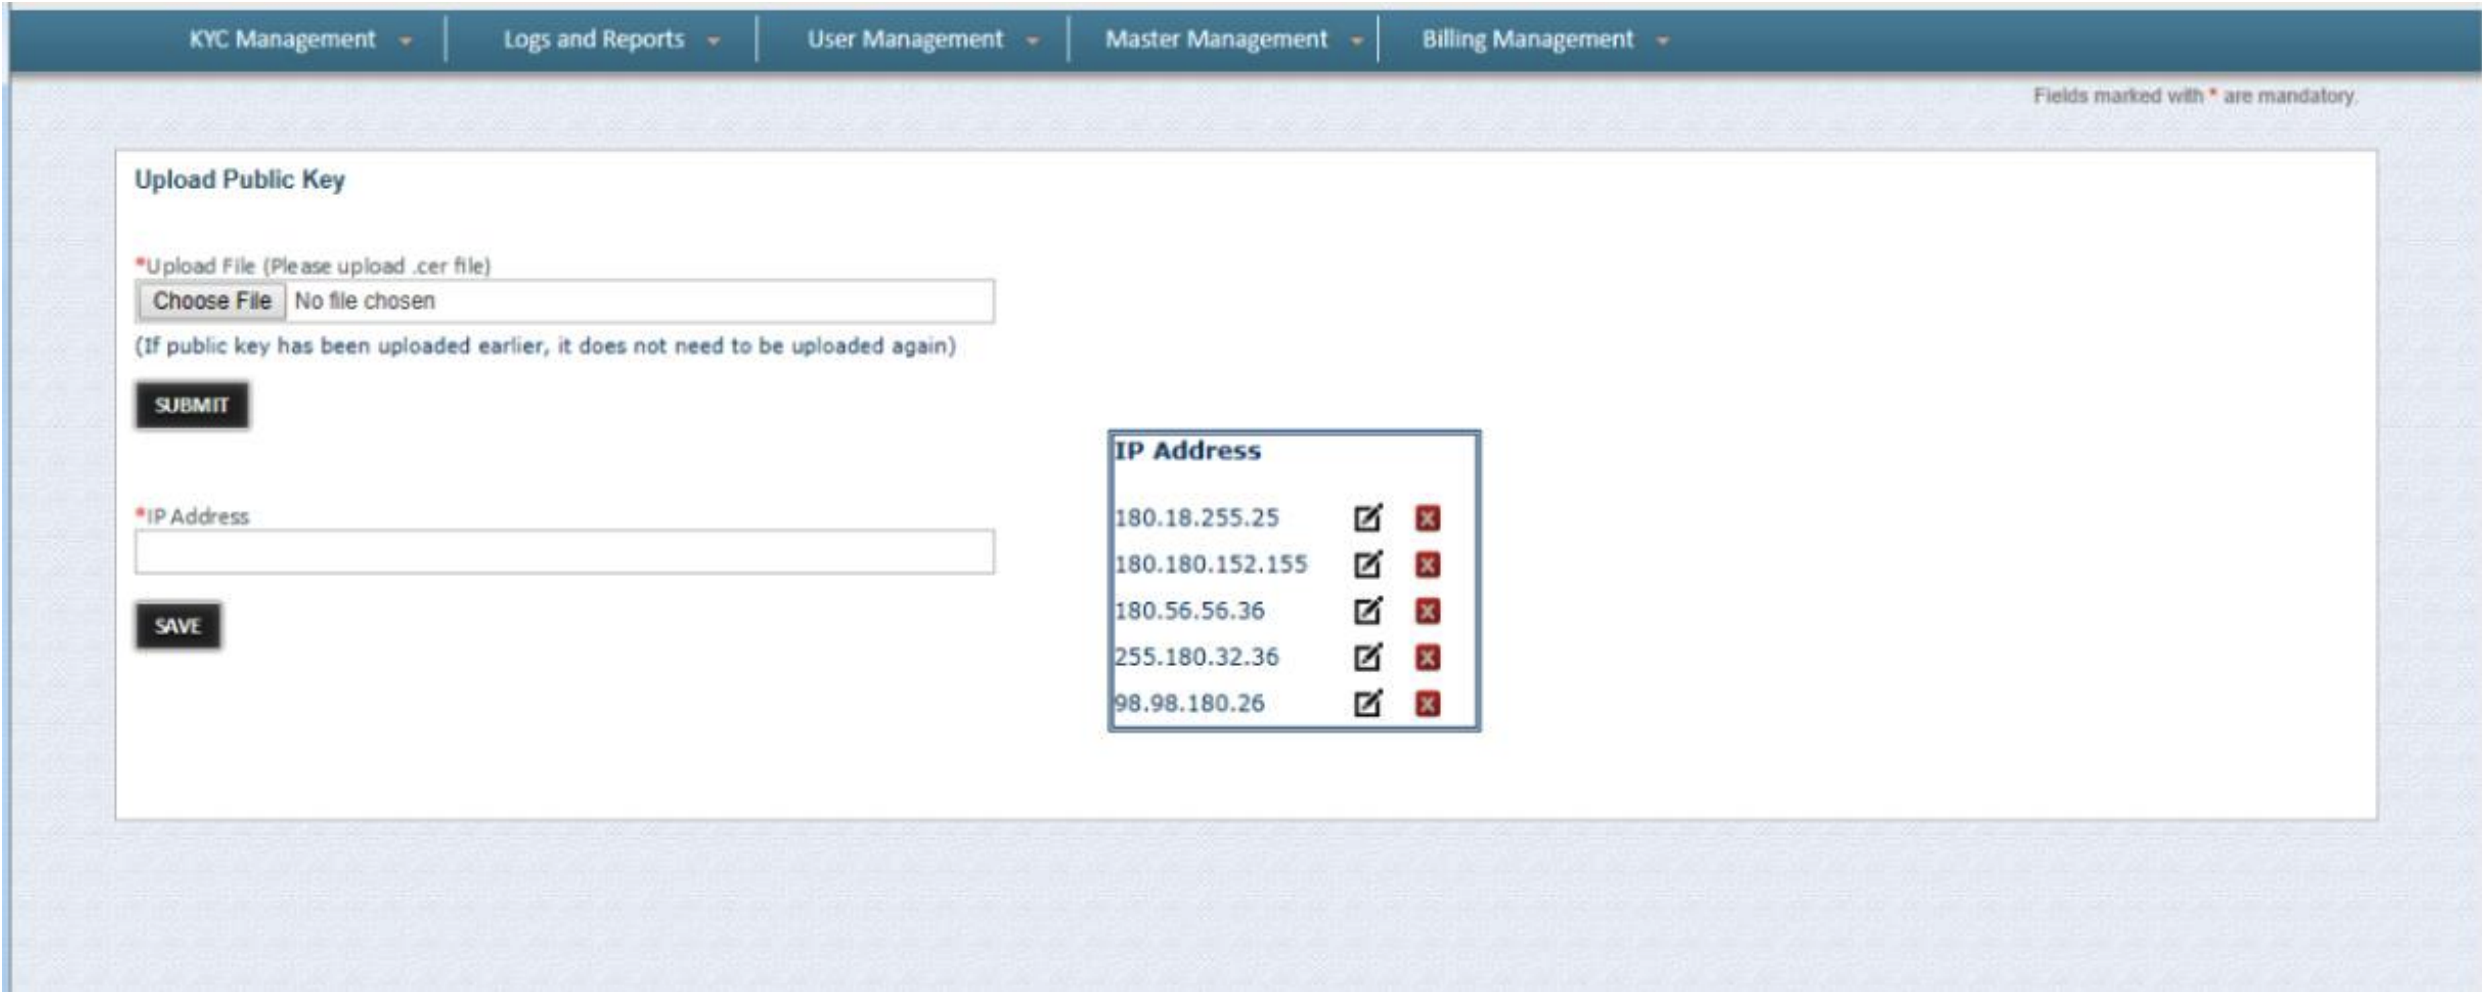
Step 2: Upload the public certificate received from Decentro.
Step 3: Whitelist the IP address that is provided by Decentro.
Step 6: Provide the following information
After performing the above steps, you will need to inform the Decentro team about the following details:
- FI Code
- Branch Code
- Region Code
- List of Emails that will get the updates
After this step, we will have everything necessary to go live. Please await a go-ahead from us for production access.
The next section provides a high-level overview of the API contracts. You can get more details regarding the technical specification of this product by checking out our API Reference for CKYC Upload.
API Contracts
📑 Request Contract
The requested contract for CKYC bulk upload will have the following parameters:
| Parameter | Type | Mandatory | Definition |
|---|---|---|---|
reference_id | String | Yes | A unique reference ID of this transaction set by the RE (UUID recommended) |
consent | Boolean | Yes | A mandatory field for compliance. This field accepts a boolean value and must be true for the transaction to go through. |
purpose | String | Yes | The purpose of this transaction |
verifier | Object | Yes | This is an object that contains the KYC verifier details. Please refer to the Verifier section to learn more about the parameters within this object. |
individuals | Array | No | An array of individuals whose details are to be uploaded to CKYC. Refer the Individual array |
legal_entities | Array | No | An array of legal entities whose details are to be uploaded to CKYC. |
Rule of Thumb
You must either send a list of
individualsor a list oflegal_entitiesonly.You cannot send both these fields in the same request because CKYC has different rules for creating a batch of different entities and mandates that a batch has either only a set of
individualsorlegal_entities.Hence, to maintain simplicity and a clean interface, we have segregated CKYC Upload for Individuals and Legal Entities into 2 separate APIs.
🧑🏻 Upload Individuals
The following shows a sample request and response body for uploading individuals to the CKYC Record Registry. For more information on the parameters inside the individuals array, please refer to the Upload Individuals API for individuals.
Baked-in Aadhaar Masking
Worried about the documents being uploaded to CKYC aren't masked properly?
Well, don't worry! The CKYC Upload API now automatically performs Aadhaar masking whenever the document submission type is
OFFLINE_VERIFICATION.
{
    "reference_id": "12345",
    "consent": true,
    "purpose": "For bank account purpose",
    "verifier": {
        "name": "John Doe",
        "designation": "CEO",
        "employee_code": "123456789",
        "kyc_declaration_date": "YYYY-MM-DD",
        "kyc_declaration_place": "Bangalore"
    },
    "individuals": [
        {
            "identifier": "1",
            "salutation": "MR",
            "name": "John Doe",
            "gender": "MALE",
            "date_of_birth": "YYYY-MM-DD",
            "contact_number":"+919999999999",
            "residential_status": "RESIDENT", ,
            "differently_abled": {            //optional block
              "status": "Y",
              "impairment_type": "01",
              "impairment_percentage": "20",
              "udid_number": "CERT2025VI123"
            },
            "location": {
                "address": "XXXXXXXXXXXXXXXXXXXX",
                "pincode": "XXXXXX"
            },
    			  "deceased":{                        //optional block
    				    "deceased_date" :"2024-01-31",
      				  "remarks": ""
     			  },
            "document_submission_type": "EKYC",
            "relative": {
                "salutation": "MR",
                "type": "FATHER",
                "name": "John Doe"
            },
            "documents": [
                {
                    "base64": "xxxx",
                    "type": "AADHAAR"
                },
                {
                    "base64": "xxxx",
                    "type": "PHOTOGRAPH"
                }
            ],
            "ids": [
                {
                    "id_number": "ABCDE1234F",
                    "type": "PAN"
                },
                {
                    "id_number": "XXXXXXXX1234",
                    "type": "VOTERID"
                }
            ]
        }
    ]
}
{
    "decentroTxnId": "DEC001",
    "status": "SUCCESS",
    "responseCode": "S00000",
    "message": "CKYC bulk upload has been initiated",
    "responseKey": "success_initiate_bulk_upload"
}
Note : The CKYC Search is now optional, to opt-out set perform_ckyc_search = false. If Search is Opted out then:
- If CKYC ID present, the records will be Updated.
- If CKYC ID not present, the records will Created.
🏦 Upload Legal Entities
The following shows a sample request and response body for uploading legal entities to the CKYC Record Registry.
{
    "reference_id": "12345",
    "consent": true,
    "purpose": "For bank account purpose",
    "verifier": {
        "name": "John Doe",
        "designation": "CEO",
        "employee_code": "123456789",
        "kyc_declaration_place": "Bangalore",
        "kyc_verification_date": "YYYY-MM-DD" //optional

    },
    "legal_entities": [
        {
            "identifier": "1",
            "consitution_type": "PARTNERSHIP_FIRM",
            "consitution_type_other": "", //optional , only with contitution_type ='R'
            "entity_name": "John Doe Partners",
            "incorporation": {
	            "place": "Bangalore",
	            "date": "YYYY-MM-DD",
	            "country_code": "IN"
            },
            "commencement_date": "YYYY-MM-DD",
            "permanent_location": {
                "address": "XXXXXXXXXXXXXXX",
                "pincode": "XXXXXX"
            },
            "current_location": {
                "type": "Business",
                "address": "XXXXXXXXXXXXXXX",
                "pincode": "XXXXXX"
            },
            "related_individuals": [
                {
                    "type": "DIRECTOR",
                    "deletion_flag": false,
                    "salutation": "MR",
                    "name": "Jane Doe",
                    "ckyc_number": "XXXXXXXXXXXXXXX"
                }
            ],
            "document_submission_type": "CERTIFIED_COPIES",
            "documents": [
                {
                    "base64": "<base64>",
                    "type": "CERTIFICATE_OF_INCORPORATION"
                },
                {
                    "base64": "<base64>",
                    "type": "REGISTRATION_CERTIFICATE"
                }
            ],
            "ids": [
                {
                    "id_number": "XXXXXXXX1234",
                    "type": "CERTIFICATE_OF_INCORPORATION"
                },
                {
                    "base64": "<base64>",
                    "type": "REGISTRATION_CERTIFICATE"
                },
                {
                    "id_number": "XXXXXXXX1234",
                    "type": "PAN"                //mandatory
                }
            ]
        }
    ]
}
{
    "decentroTxnId": "DEC001",
    "status": "SUCCESS",
    "responseCode": "S00000",
    "message": "CKYC bulk upload has been initiated",
    "responseKey": "success_initiate_bulk_upload"
}
📂 CKYC Upload Go-live without any API integration – File Format Guide
This document outlines the structure and expected formats for uploading CKYC request files and receiving response files via SFTP.
You can also choose to consume the CKYC Upload services via Decentro SFTP (available with a web UI).
✅ Supported Upload Structure
To perform a CKYC upload, send a ZIP file to our SFTP in the following format:
File name pattern:
individual_upload_{reference_id}.zip
ZIP Contents:
individual_upload_{reference_id}.zip
├── batch-details.csv
├── individuals.csv
└── documents/
    └── <file_name>.<extension>
📄 batch-details.csv
batch-details.csvDetails of the employee initiating the CKYC upload.
| Field | Description |
|---|---|
| name | Full name of employee |
| designation | Job title/designation |
| employee_code | Unique employee code |
| kyc_declaration_date | Date of KYC declaration (YYYY-MM-DD) |
| kyc_declaration_place | Place where KYC was declared |
📄 individuals.csv
individuals.csvDetails of each individual being uploaded for CKYC.
    - identifier
    - kyc_verification_date
    - salutation
    - name
    - gender
    - date_of_birth
    - contact_number
    - email_id (Optional)
    - residential_status
    - differently_abled_status
    - impairment_type
		- impairment_percentage
		- udid_number
    - location_address
    - location_pincode
    - location_city (optional)
    - location_state_code (optional)
    - deceased_date (optional)
    - remarks (optional)
    - document_submission_type
    - relative_type
    - relative_salutation
    	- mother_name_prefix
    - relative_name
    	- mother_first_name, mother_middle_name, mother_last_name (Optional)
    - id_type: example (PAN|AADHAAR) -> For multiple values, use a pipe delimiter
    - id_number: example (XXXXXXXX1234|ABCDE1234F) -> For multiple values, use a pipe delimiter
    - document_type: example (PAN|AADHAAR) -> For multiple values, use a pipe delimiter
    - document_path: example (123.pdf|123.jpeg) -> For multiple values, use a pipe delimiter
🗂 documents/ Folder
documents/ FolderContains supporting documents (e.g., scanned copies of PAN or Aadhaar).
Ensure filenames match the document_path field in individuals.csv.
Supported formats: .pdf, .jpeg, .jpg, .png
📥 Response File
After processing, you will receive a response file:
File name pattern:
individual_upload_{reference_id}_response.csv
Fields:
| Field | Description |
|---|---|
| decentro_txn_id | Unique transaction ID from Decentro |
| status | SUCCESS / FAILURE |
| message | Processing status message |
| response_key | Reference key for future queries |
| response_code | Status or error code |
For any issues, please contact your Decentro account manager or support team.
Callback Acknowledgment Requirement
To ensure successful processing and acknowledgment of callbacks, the client must respond with the following payload upon receiving any callback (including bulk search, download, and upload callbacks):
{
  "response_code": "CB_S00000"
}
Note: This is a mandatory requirement. Please ensure this is implemented to prevent callback retries or failures.
Post Go-Live
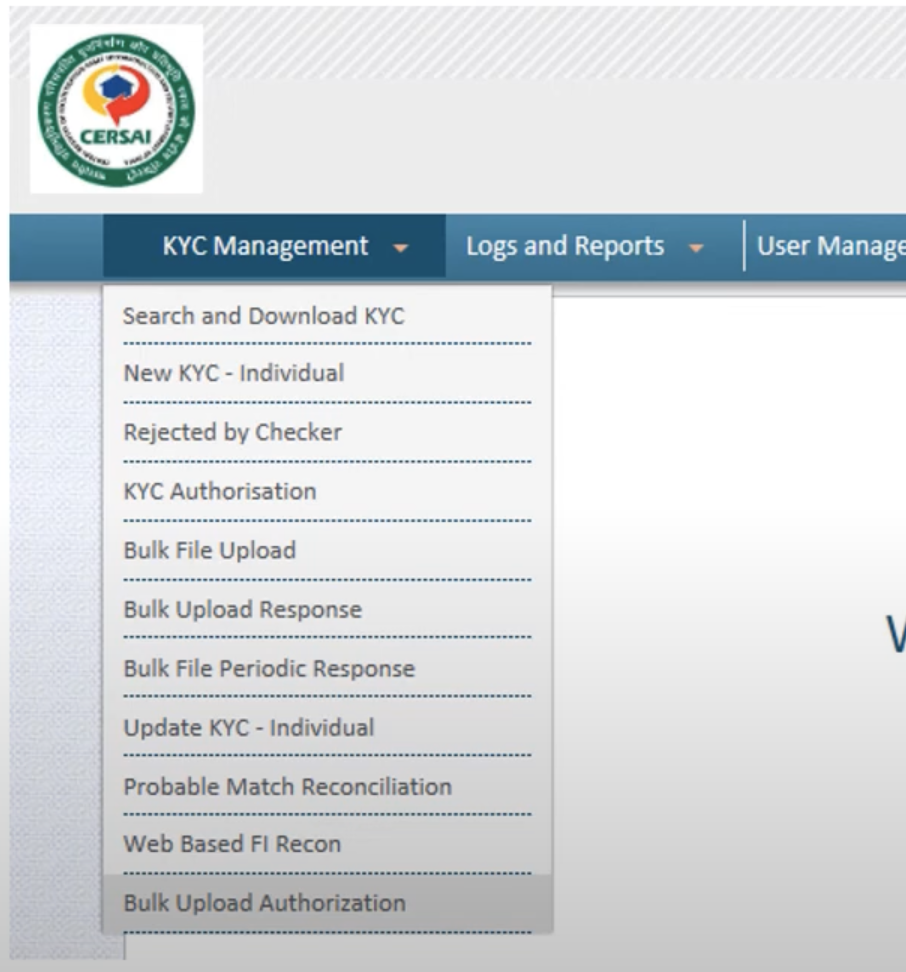
You can manage the authorization in the “Bulk Upload Authorization” in the CKYC Portal as shown below.
CERSAI KYC Managmentment >> Bulk Upload Authorization
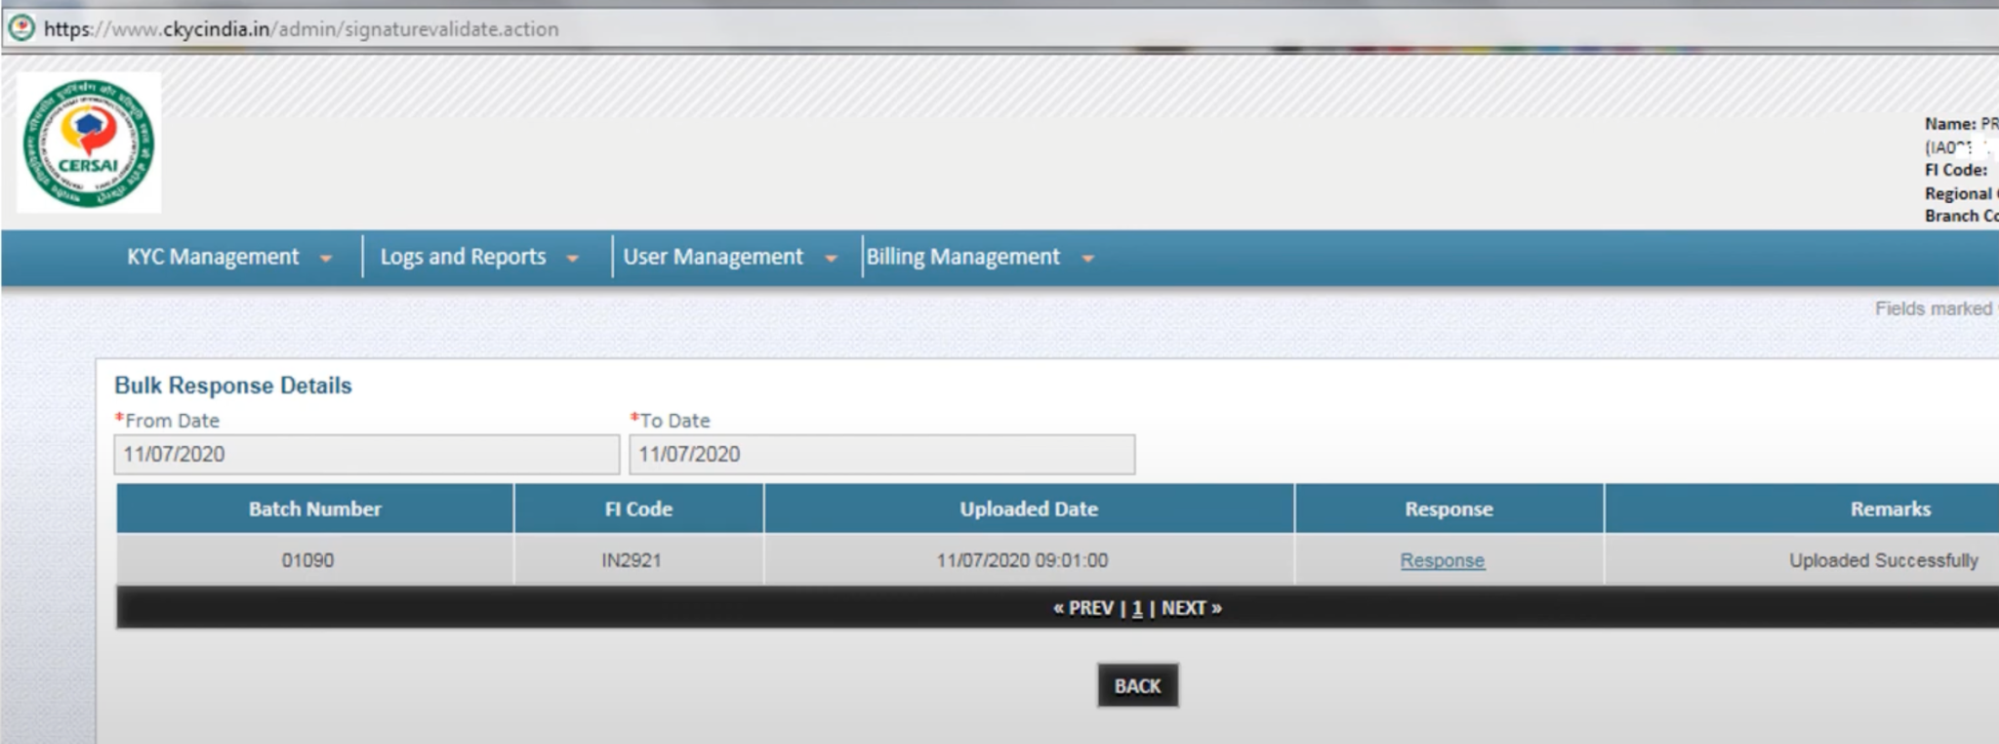
You can also view the successful SFTP bulk upload responses in the same place where you view regular bulk upload responses, in the “Bulk Upload Response” section.
If you are a financial institution that does not have CKYC credentials, we encourage you to use Decentro’s CKYC Upload without Native Setup as UAT testing and go live on your FI code. If you are interested in getting your own credentials, please refer to Appendix 1 and 2.
Appendix 1: How to get your own CKYC credentials?
The process for Financial Institutions (FIs) to register with the Central KYC Registry is long and tedious. If you are willing to go through this painstaking ordeal, then the process is as follows:
- Visit the website of CKYC here -> Central KYC (CKYC).
- Click to register a new FI registration.
- First, you have to add the details of an individual who is the “admin” in this case.
- Then, you have to enter the details of your financial institution.
- Provide the details of the regulating body you are registered with (RBI, SEBI, etc).
- Download the filled FI registration form and submit it along with the required documents.
Appendix 2: Documents required for CKYC credentials
- A Duly signed Institution Registration Form of the FI
- Licence, Certificate, and Notification issued by the regulator
- PAN card of the Financial Entity
- Corporate Identification number in case the Institution holds multiple Licences
- In the case of Co-Operative Banks or Societies, you need to submit a Registration Certificate issued by the concerned authority
- The Authorization letter from the competent authority for Admin Users should be signed by the Authorised Signatory/ Director
- Certified copy of the photo identity card of the user administrator issued by the respective institution
- Certified copy of any ID proof of the user administrator.
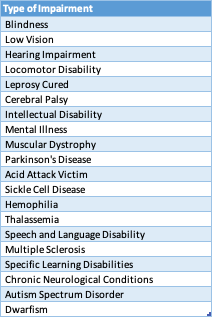
List of type Of Impairments
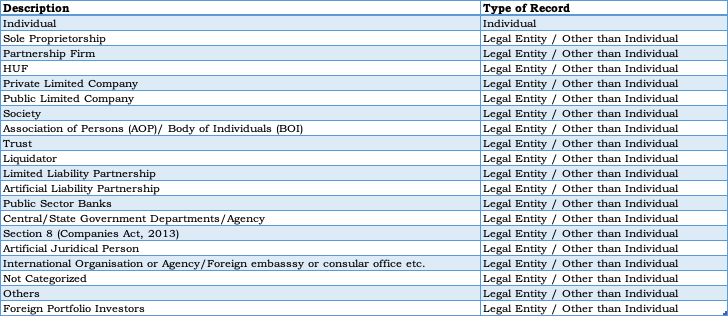
List of Constitution Type
List of Related Person

Updated 7 months ago