
Decfin Dashboard
Overview & Navigation
The dashboard is organized into clear functional groups in the left-hand sidebar:
- Dashboard — Overview, Application Management
- Collections — UPI Collections, Virtual Accounts, Push to VPA Transactions, Static QR
- Recurring Payments — NACH, UPI Autopay
- Account Validation — Reverse Penny Drop, User Verification
- Settlements & Refunds — Settlement History, Refunds, Manage Split Settlement, Chargeback
- Bulk Services — Bulk Upload
- Configuration & Management — Callbacks, Consumer Network, Credits, Reports, Role Based Access Control
- Approval Workflows — Approval Workflow, Maker Requests
Every table in the product — transactions, mandates, settlements, users — follows the same layout.
A date range picker with quick presets (Today, Last 7 days, Last 30 days, Last 3 months, and more)
A search bar with a switchable field (search by Transaction ID, Virtual Account Number, URN, etc.)
A filter panel for narrowing results by status, type, category, etc
Refresh, column settings, and export icons in the top-right of every table
Application Management
On our staging dashboard, once you have explored our product suite and played around in the sandbox, you can choose to fill out our KYB (Know your business) application form directly from the dashboard.
Please note that this is a step mandated by RBI for all regulated entities to correcly evaluate a merchant and assess and divert potential risks.
Additionally you can also access the application form here: https://forms.decentro.tech/
Role Based Access Control
Your dashboard includes built-in Role Based Access Control, so you can decide exactly who on your team can see and do what — all without sharing your admin login.
- Create custom roles tailored to how your team works (e.g. a support role that can only view transactions, or a finance role that can also process refunds), by selecting from a full list of dashboard permissions.
- Invite team members directly from the dashboard with just their name and email — they'll receive access under the role you assign them.
- Invited users receive a sign-up link in their registered email and need to set their password. Once done, they can log in to the dashboard.
- Update or remove access at any time as roles change, without needing to contact support.
- View and manage all users and roles for your account from a single screen, so you always have a clear picture of who has access to what.
- This gives you full control over your team's access from day one, with the flexibility to adjust permissions as your organization grows.
Approval Workflows
Creating and Using Approval Workflows
Approval Workflows let you add a layer of dual-control sign-off on top of sensitive actions in your dashboard, so nothing sensitive goes through without the right eyes on it first.
- Who can set this up: Only users with the Admin role can create or edit approval workflows — this keeps control over what requires sign-off in trusted hands.
- How to create one: From Approval Workflows, choose the action you want to protect (currently supported for Refunds and Bulk Operations), select a Level 1 Approver role (approvers are set at a role level and not user level), and optionally enable Tiered Access to require a Level 2 Approver as well. You can also set a minimum Threshold Amount so only transactions above that value need approval.
- What happens next: Once a workflow is active, any matching request is held as "Pending" until it's approved — it will not execute until the required approver(s) sign off. Everything else continues to work exactly as before; only the actions you've configured are affected.
- Tracking requests: Requesters can track their submissions on the Maker screen (defaults to pending requests, with a History view for approved/rejected ones), while approvers review and act on requests from the Checker screen, adding remarks with each approval or rejection.
- Full audit trail: Every decision — who approved, who rejected, and any remarks at each level — is logged and viewable, giving you a clear compliance record for every gated action.
Collections
Transaction History
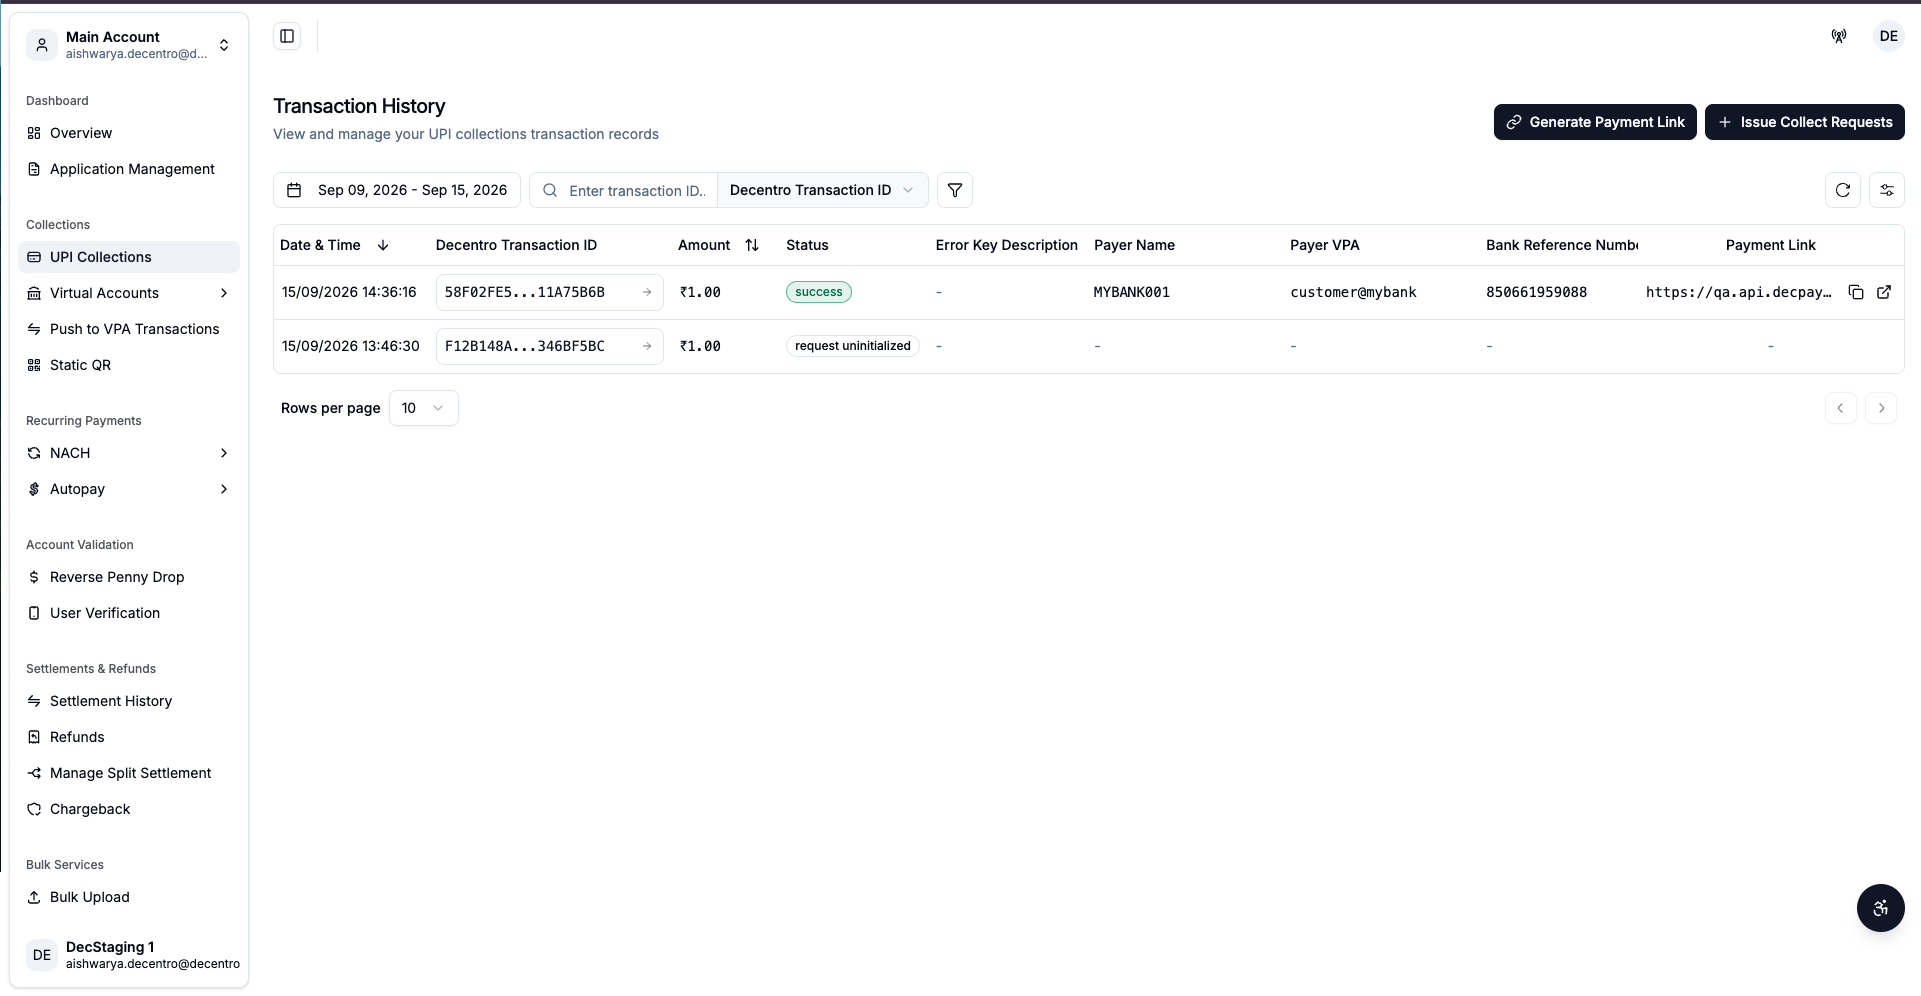
The primary ledger of incoming UPI collection payments. Columns include:
- Date & Time, Decentro Transaction ID, Amount, Status (pending / success / expired), Error Key Description, Payer Name, Payment Link.
Clicking a row opens a Transaction Overview page with transaction attempt details:
- Created On, Decentro Transaction ID, Amount, Status Payer VPA, Payee VPA, Collection Type (e.g. Payment Link)Customer Reference, Bank Reference, Purpose Message, and the Payment Link itself.
- Attempt Details: a sub-table logging each payment attempt against that transaction (ID, amount, status, error description, payer/payee VPA, provider message) — useful for debugging failed or retried payments.
You can also choose to Generate Payment Links, Dynamic QRs or Collect Requests
Virtual Accounts
Transaction History
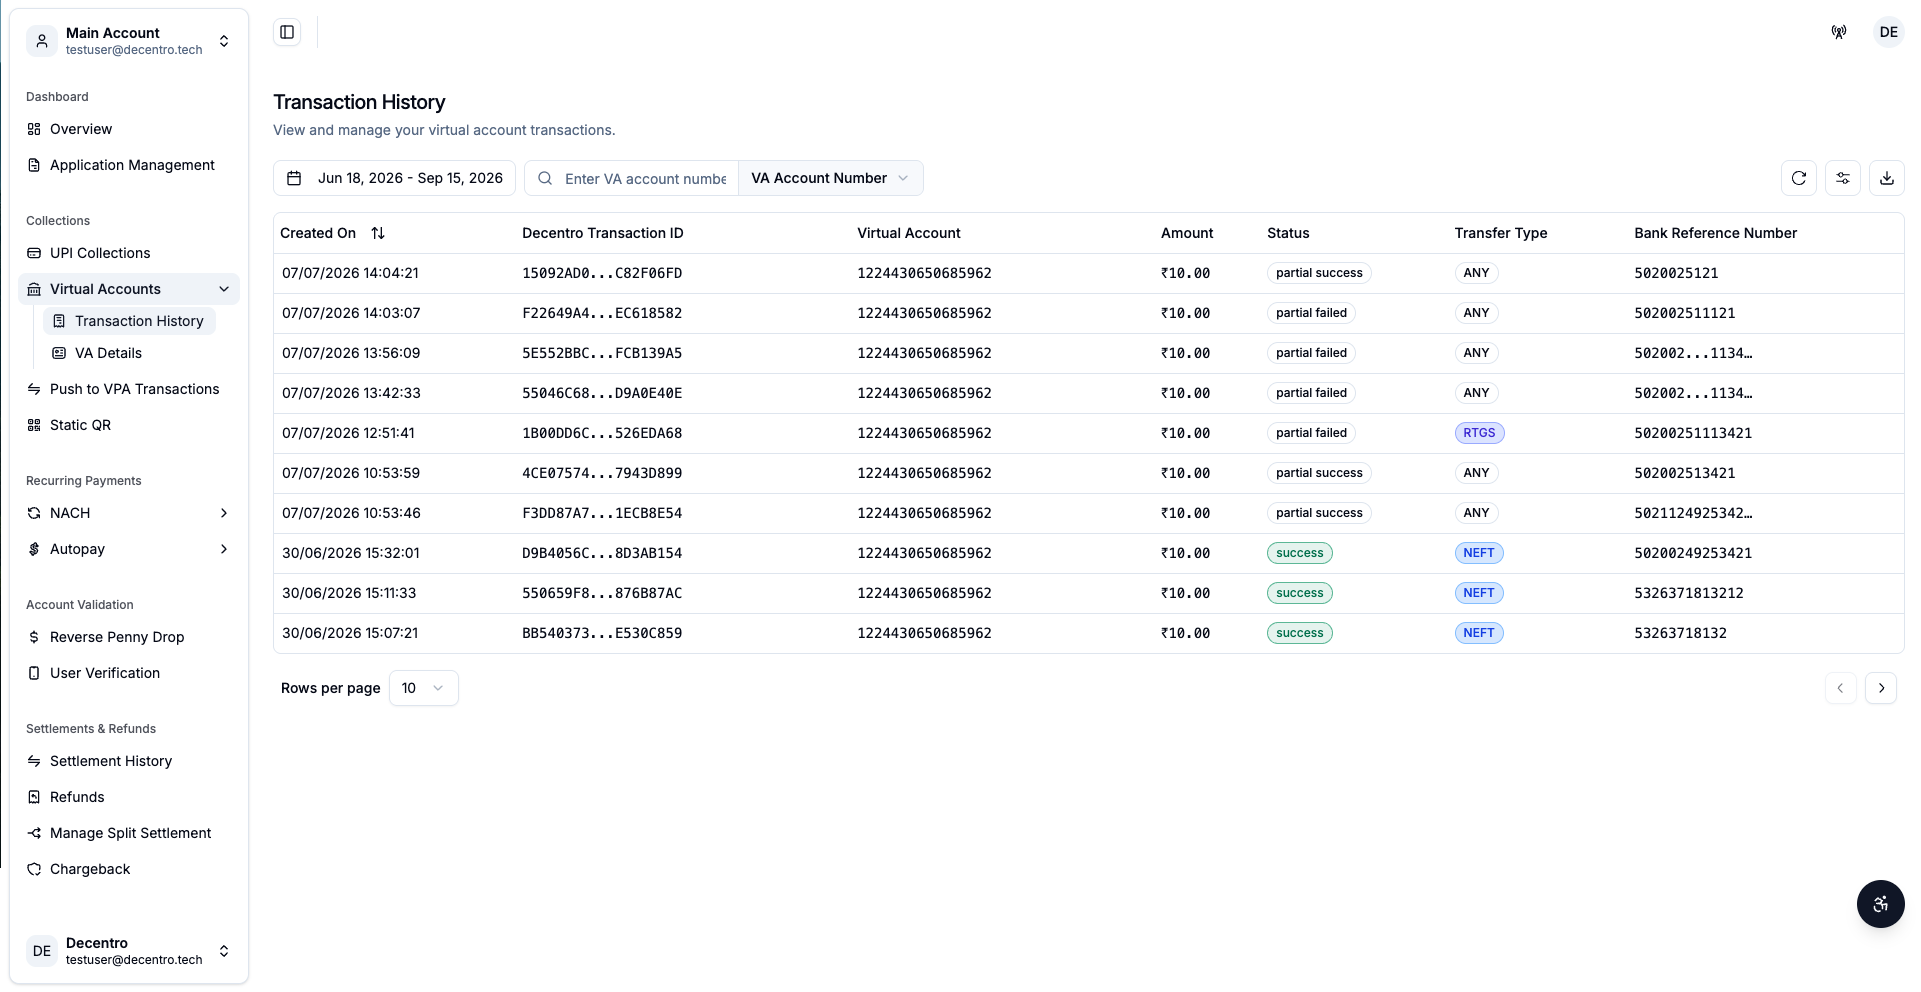
All inbound transactions received into virtual accounts, filterable by Decentro Transaction ID / Virtual Account, with columns for date, amount, status, and transfer type and Bank Reference Number.
VA Details
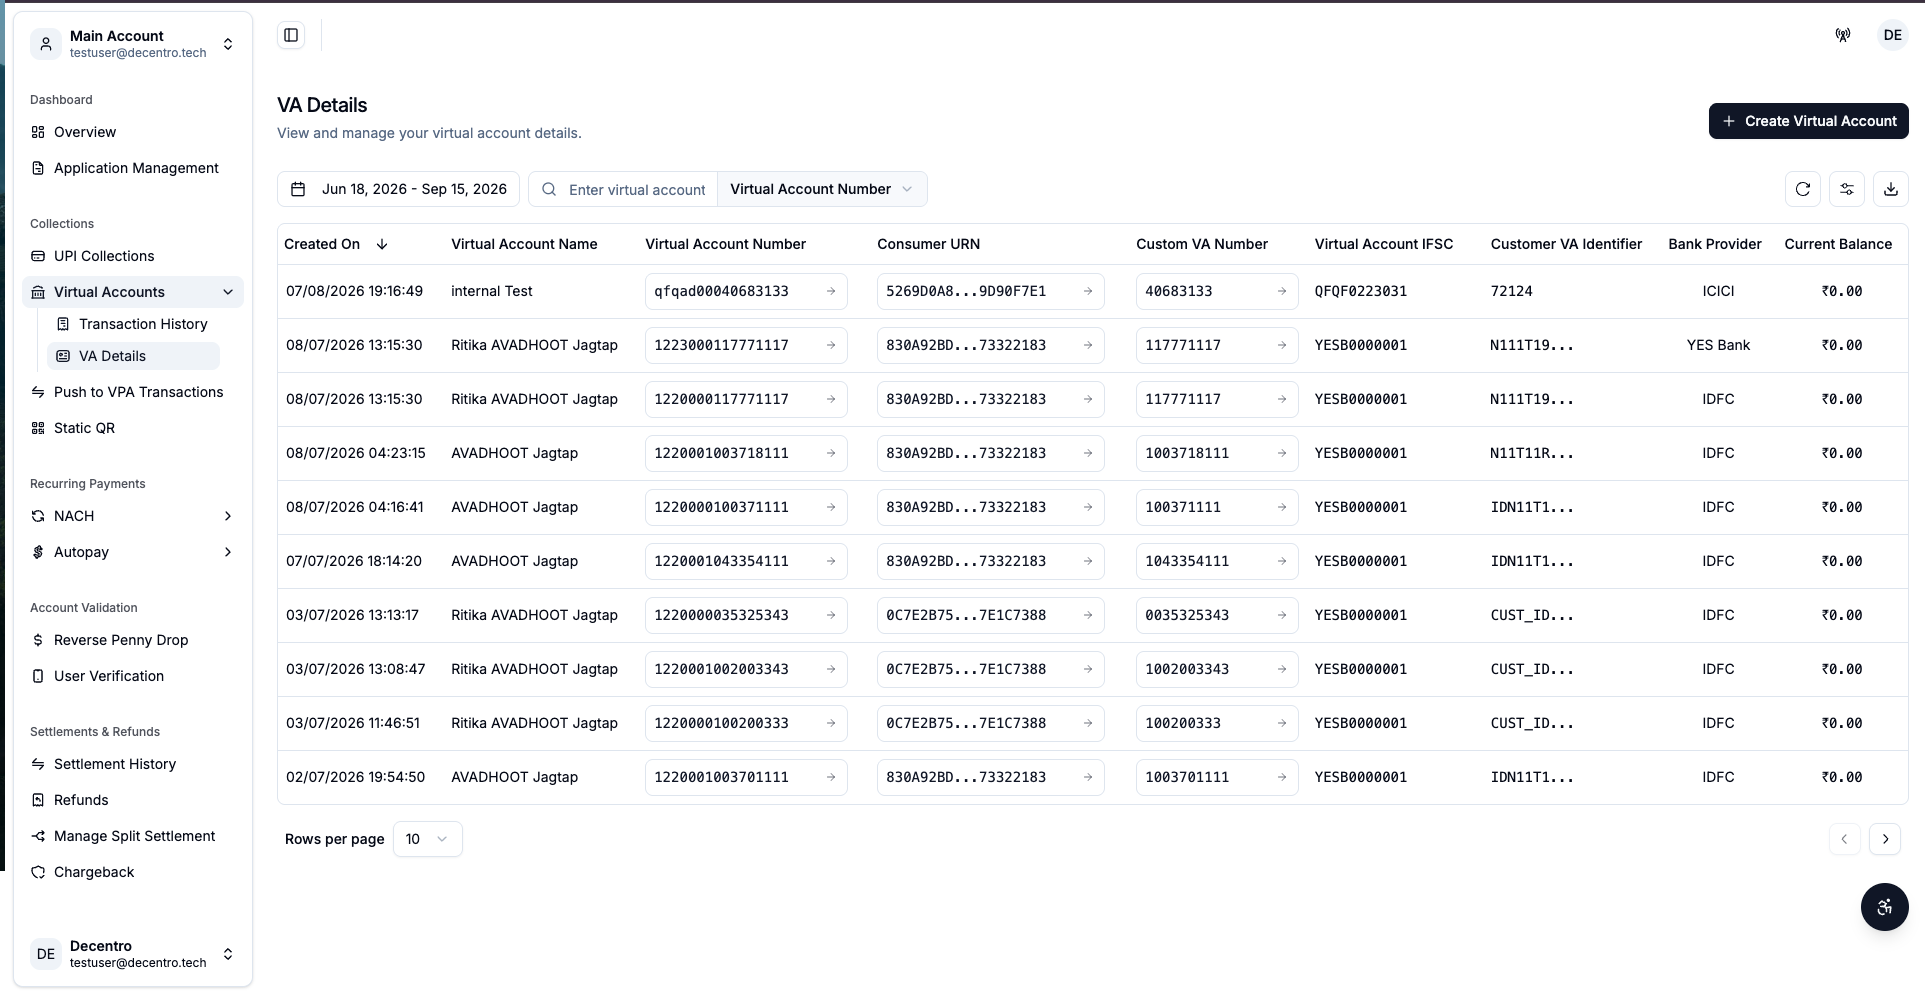
This module lists all created virtual accounts (Created On, Virtual Account Name, Virtual Account Number, Consumer URN, Custom VA Number, Virtual Account IFSC, Customer VA Identifier, Bank Provider, and more).
- You can view all the transactions processes via any VA by simply clicking on it and viewing the transaction history in a drilldown view.
- You can also view all the VAs created against a consumer by clicking on the Consumer Drilldown.
- Additionally you can also check all the VA created ahaints your chosen Custom VA Identifier.
You can also choose to create a virtual account directly from this module accessible via the CTA present on the screen
Push to VPA Transactions
A ledger of inbound trenasctions pushed to a payee's UPI VPA. Filterable by Decentro Transaction ID; columns include Date-Time, Decentro Transaction ID, Amount, Payee Name, Payer VPA, Payee VPA, NPCI Transaction ID, and Purpose.
Static QR
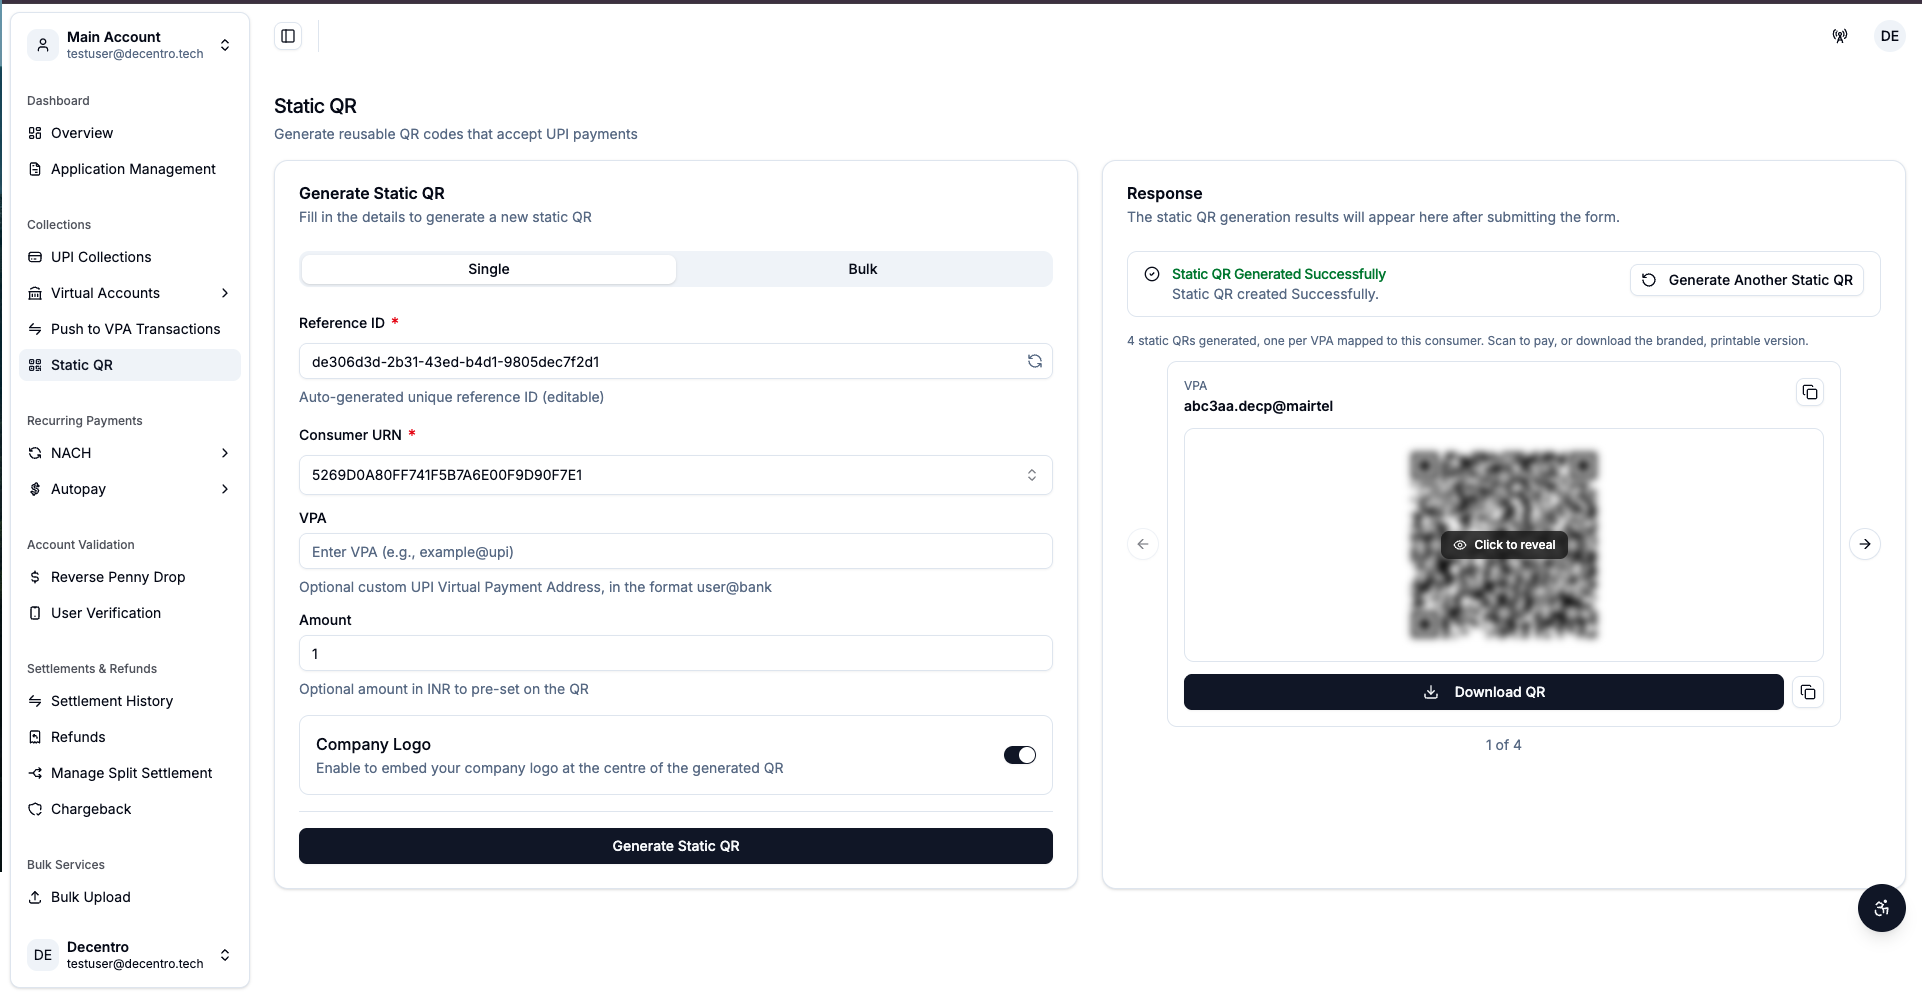
Generate reusable (static) QR codes that accept unlimited UPI payments to a given VPA:
-
Single mode — form fields: Reference ID (auto-generated, editable), Consumer URN, VPA (optional custom VPA, format example@bank), Amount (optional — leave blank for an open-amount QR), and an optional Company Logo to brand the QR.
-
Bulk mode — upload a CSV (sample file downloadable) with the same fields per row, plus an email address to receive the batch results, then Generate Bulk Static QR.
NACH (National Automated Clearing House)
Registrations
This module includes list of registered NACH mandates (Created On, Decentro Transaction/Mandate ID, Sequence, Frequency, From/To Date, Fixed/Maximum Amount, Status such as active/expired/rejected).
Filters support Frequency, Category , Sequence and Status.
You can also choose to register a Mandate directly via the dashboard accessible through the CTA.
Presentations
This module includes the record of actual debit attempts made against registered mandates (Debit Date, Created On, Decentro Transaction/Mandate ID, Transaction Reference, Amount, Remarks, Error Key Description, Status). Create Presentation Mandate submits a new presentation for an existing mandate.
Autopay (UPI Autopay)
A UPI-native alternative to NACH for recurring mandates.
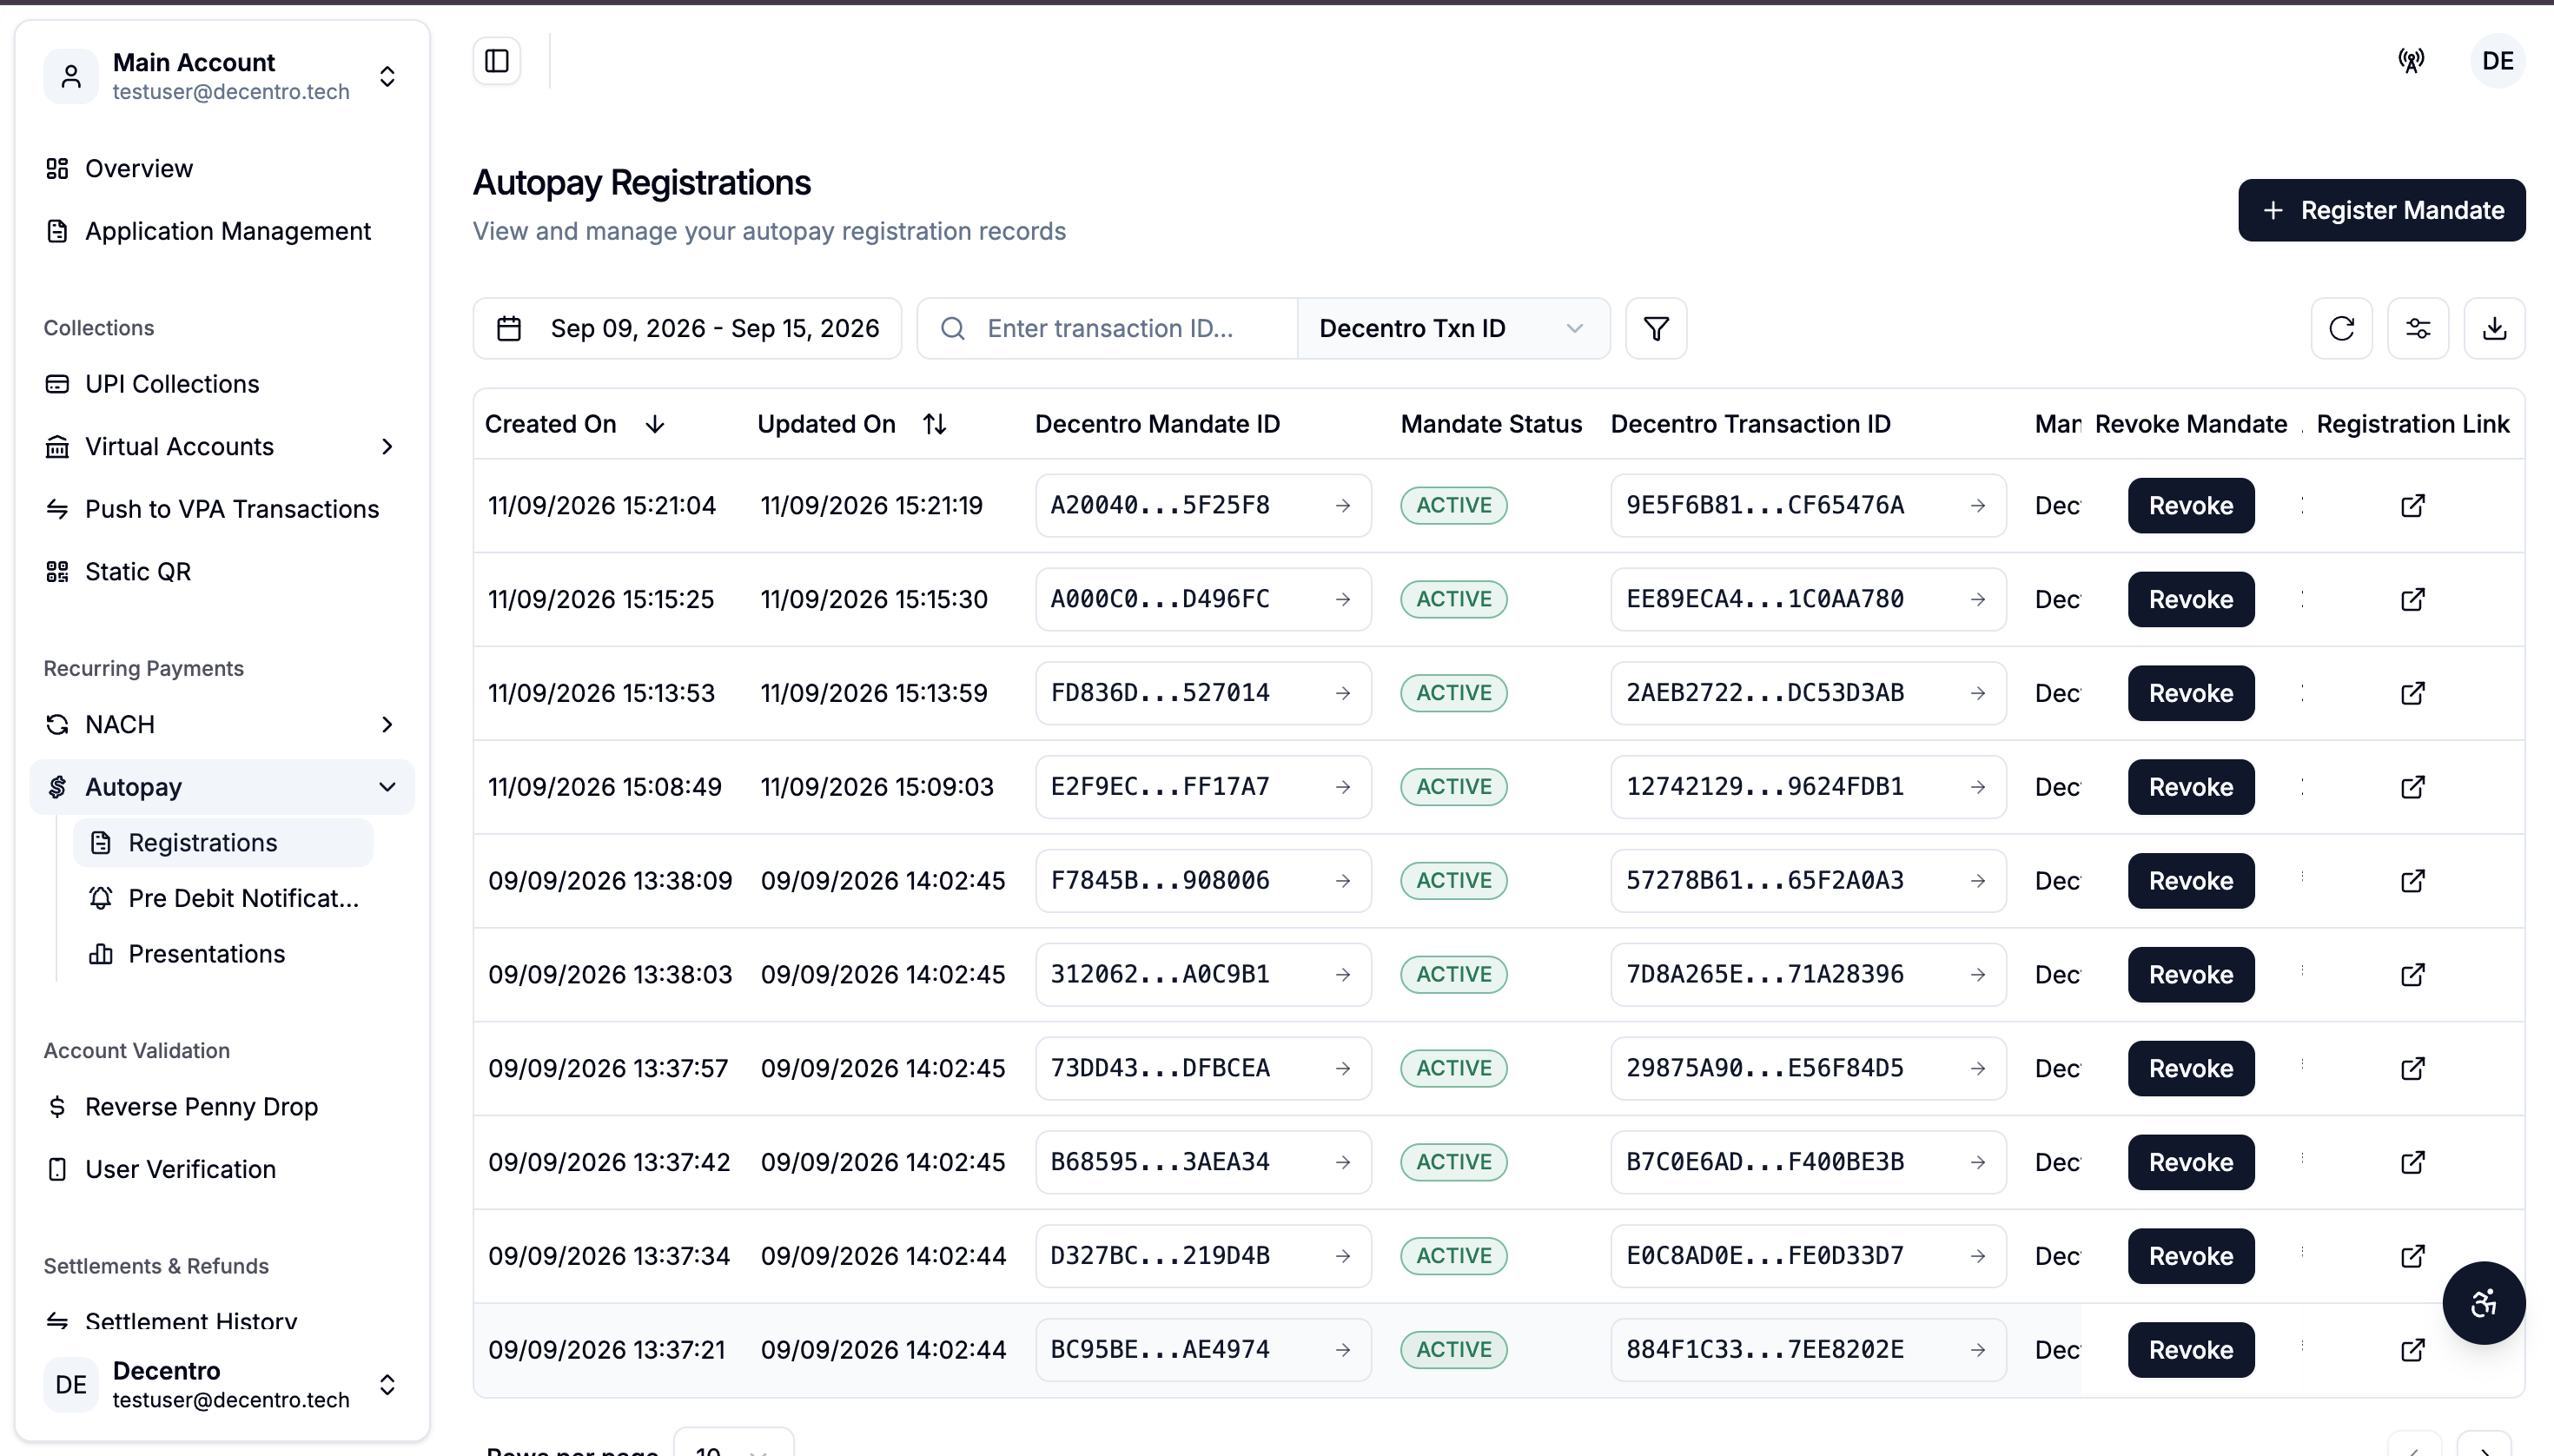
Registrations —
- The module displays all registered Autopay mandates (Created On, Updated On, Mandate ID, Decentro Mandate ID/Transaction ID, Mandate Name, Revoke Mandate, Mandate Status, Frequency Type)
- Registering a Mandate requires users to fill the following details: Reference ID, Consumer URN, Mandate Name, Payment Method, Amount Rule , Default Amount, Frequency, Purpose Message, Tenure, and Expiry Time.
- The registered mandate can be revoked at any time from the data table if
is_revokableflag had been passed as true during mandate registrations provided mandate has not been presented.
Pre-Debit Notification
- This module displays a list of all Pre-Debit Notifications sent .
- To create a Pre-Debit Notification fill: Reference ID, Decentro Mandate ID, Debit Amount, Debit Date.
- It is filtrable by Status and searchable by Decentro Transaction ID as well as Decentro Mandate ID.
Presentations
- Lists the executed/attempted debits against Autopay mandates (Created On, Updated On, Mandate ID, Decentro Transaction ID, Presentation Sequence ID, Mandate Presentation Status).
- To Present/execute a Mandate fill: Presentation Sequence ID, Consumer URN, Settlement Rule URN (optional).
Reverse Penny Drop
Validates that a bank account/VPA belongs to the claimed holder by depositing (and reclaiming) a token amount, or via a validation link.
- Lists the RPD transactin initiated, displaying: Request Timestamp, Decentro Transaction ID, Validation Link, Expiry Time, QFlag Details, Verification Details — filterable by Status (Success/Pending/Expired/Failed/Unvalidated).
- To Generate a validation link fill: Reference ID, Consumer URN, Expiry Time. Response returns a shareable validation link/QR.
Settlement History
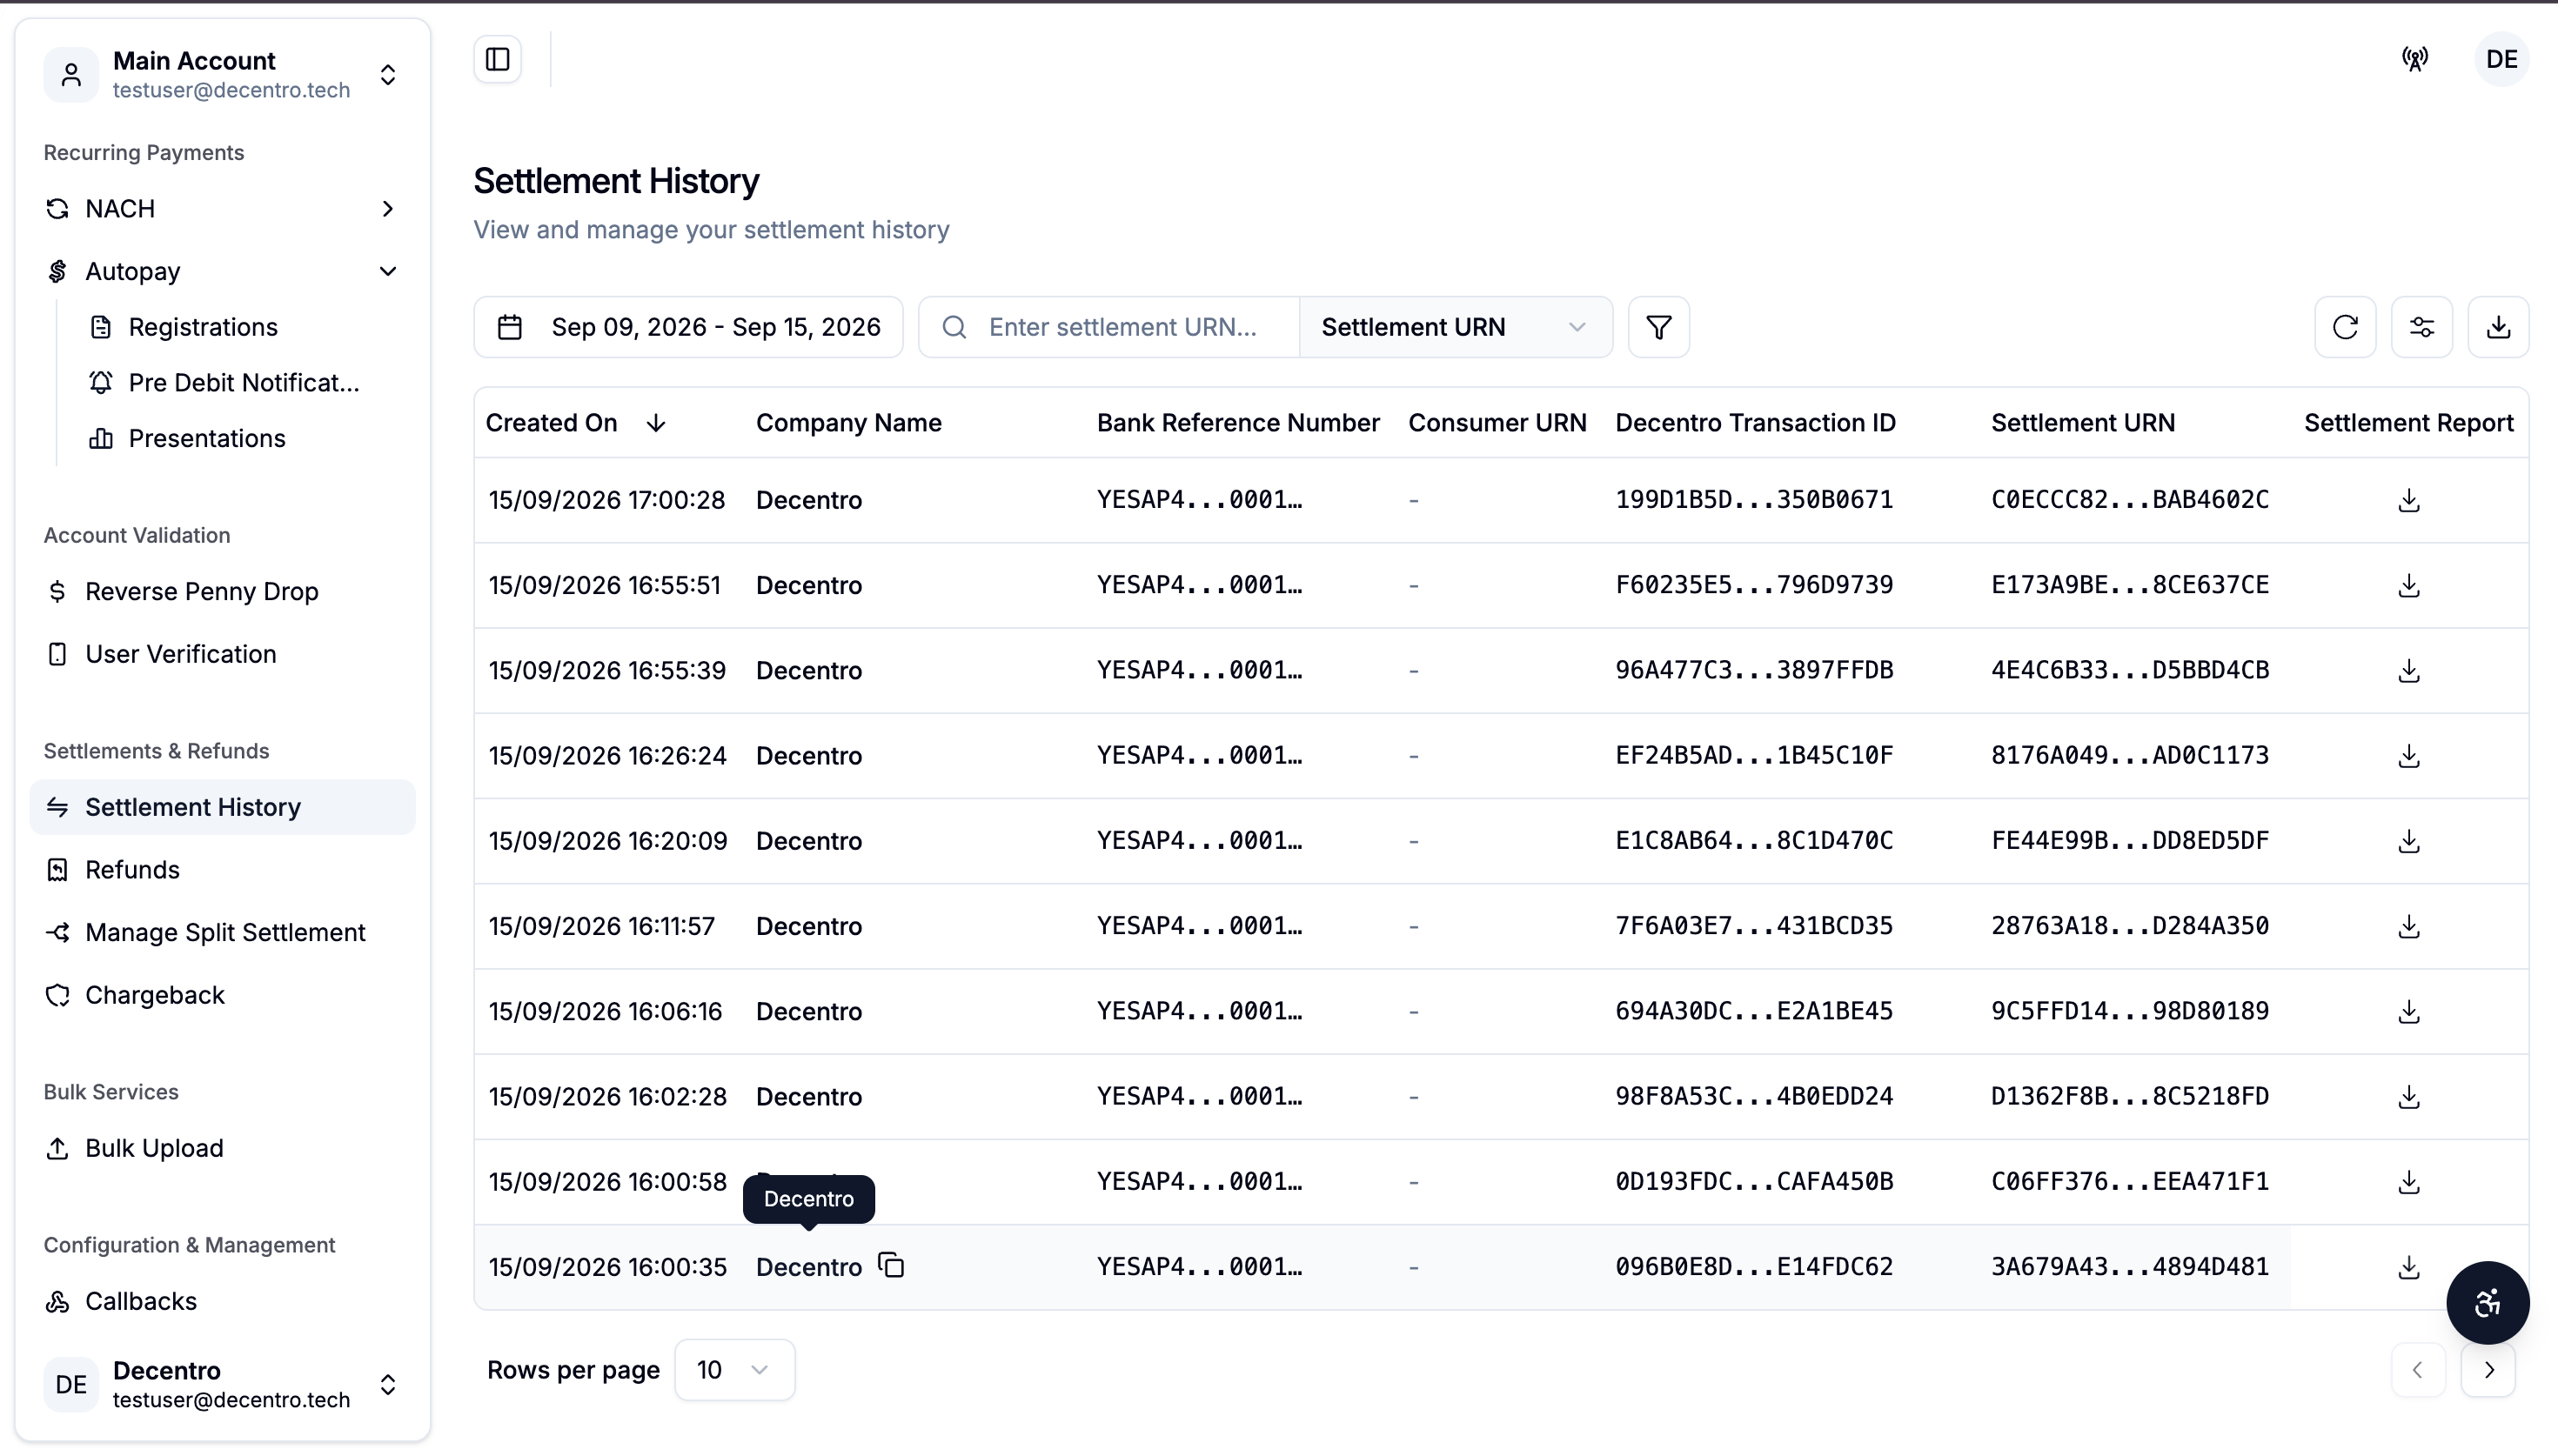
The settlement history screen provides users a detailed view of all the dues that have been settled:
- Table displays: Created On, Company Name, Bank Reference Number, Consumer URN, Decentro Transaction ID, Settlement URN, Gross/Net Amount, Commission Amount, Refund Amount, Lien Amount, Float Top up Amount Transaction level Settlement Report
- Filterable by Channel Type (UPI Collection, E-Collect, NACH, UPI Autopay, Settlement), settlement status.
- Searchable By Bank Reference Number, Settlement URN and Decentro Transaction ID.
Refunds
- Tabular view of refund requests with filters (Success/Completed/Failed/Unfulfilled statuses implied by the UI).
- To raise a Refund, fill the following:
- Reference ID — auto-generated for you, or customize it with your own (minimum 8 characters)
- Process Refund For — select the transaction (e.g. by transaction attempt ID) you're refunding
- Field Type and Bank Reference Number — identify the exact transaction to process against
- Enable Partial Refund — toggle off for a full refund, or leave on to specify a partial amount
- Purpose Message — add a short note explaining the reason for the refund
- You can also raise a refund directly from the drilldown page of any successful UPI transaction or UPI Autopay presentation — simply select Refund from there, and the transaction ID is pre-filled for you automatically, so there's no need to look it up or re-enter it.
Chargeback
Track disputed transactions raised by card/bank networks.
- Tabular view of chargeback raised: Created On, Raised On, Chargeback URN, Transaction Company URN, Transaction Decentro Company URN, Bank Reference, Action.
- Filterable by Chargeback URN or by Transaction Company URN.
- You can either approve, deny or partially approve a chargeback.
- To deny a chargeback, proof of provided service is mandatory.
Bulk Services
Users can generate the following in Bulk:
- Payment Links
- Dynamic QRs
- Collect Requests
- NACH presentations
The process remains the same across all channel types with parameters differing with respect to the upload type chosen.
- To create a Bulk Upload form: select Bulk Process Type (Payment Link, Payment QR, NACH Presentation, Collect Request), Reference ID, and Upload File with required details (refer to the sample files attached in the dashboard)
- The Tabular view (Bulk Upload) tracks batches: Date & Time, Decentro Company URN, Bulk Processing Type, Status, Total Records, Processed Records, Success Records, Failure Records, Input File, Output File (downloadable after batch processing is complete).
- Drilling into a batch via Decentro Transaction ID opens Transaction Details for that upload: per-row Created On, Decentro Company URN, API Status, Transaction Status, Bank Reference Number, Payer VPA, etc.
Callbacks
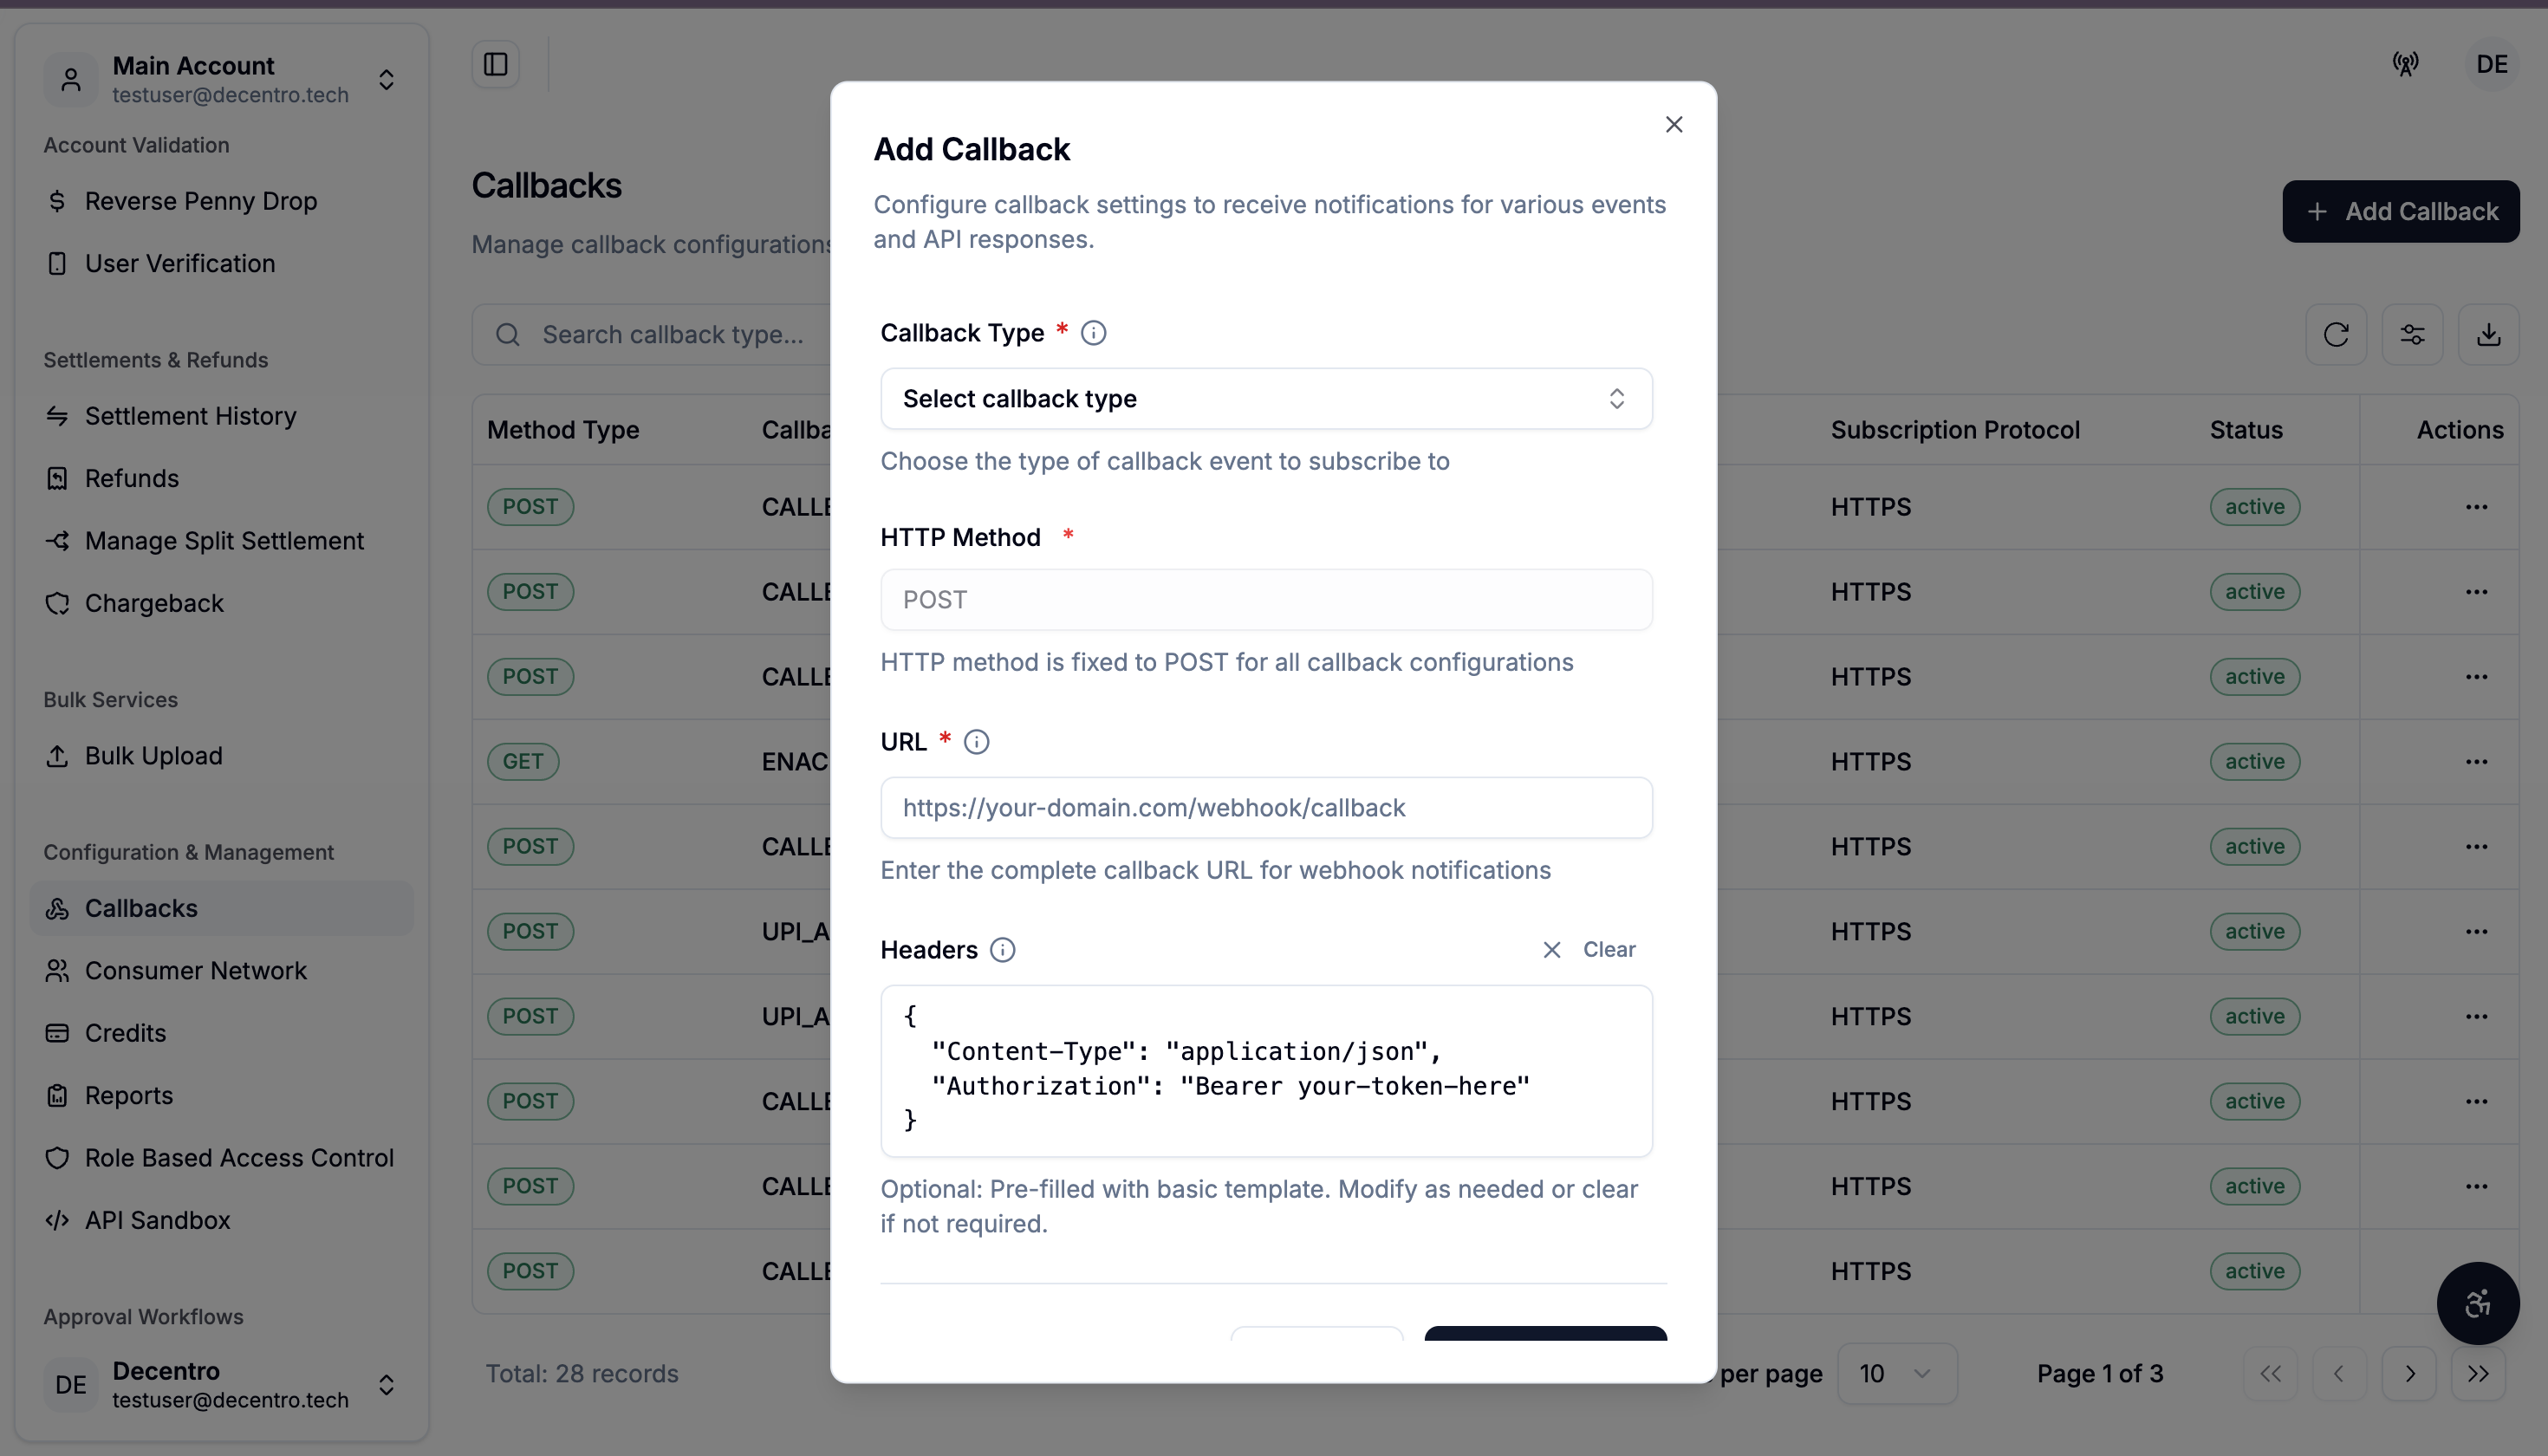
A complete list of all your configured callbacks — showing Method Type, Callback Type, URL, Subscription Protocol, and Status — filterable by Callback Type, with quick access to Actions for each entry.
To Add a Callback:
-
Callback Type — search and select the event you want to be notified about
-
Enter the Callback URL — the webhook endpoint that should receive the notification
-
Headers (optional) — add custom headers as JSON, such as Content-Type or an Authorization: Bearer , if your endpoint requires them
Edit a Callback
- Once created, the Callback Type and URL are locked for consistency — but you're free to update the Headers at any time to reflect changes on your end (e.g. a rotated token).
Consumer Network
A complete directory of every consumer or sub-merchant registered under your account. Search by name to quickly find any entry, and see key details at a glance — Consumer URN, Parent Name, Merchant Type, and Consumer Type — along with a status indicator for each row, so you always have a clear view of your consumer network.
Reports (Reports & Analytics)
MIS Reports
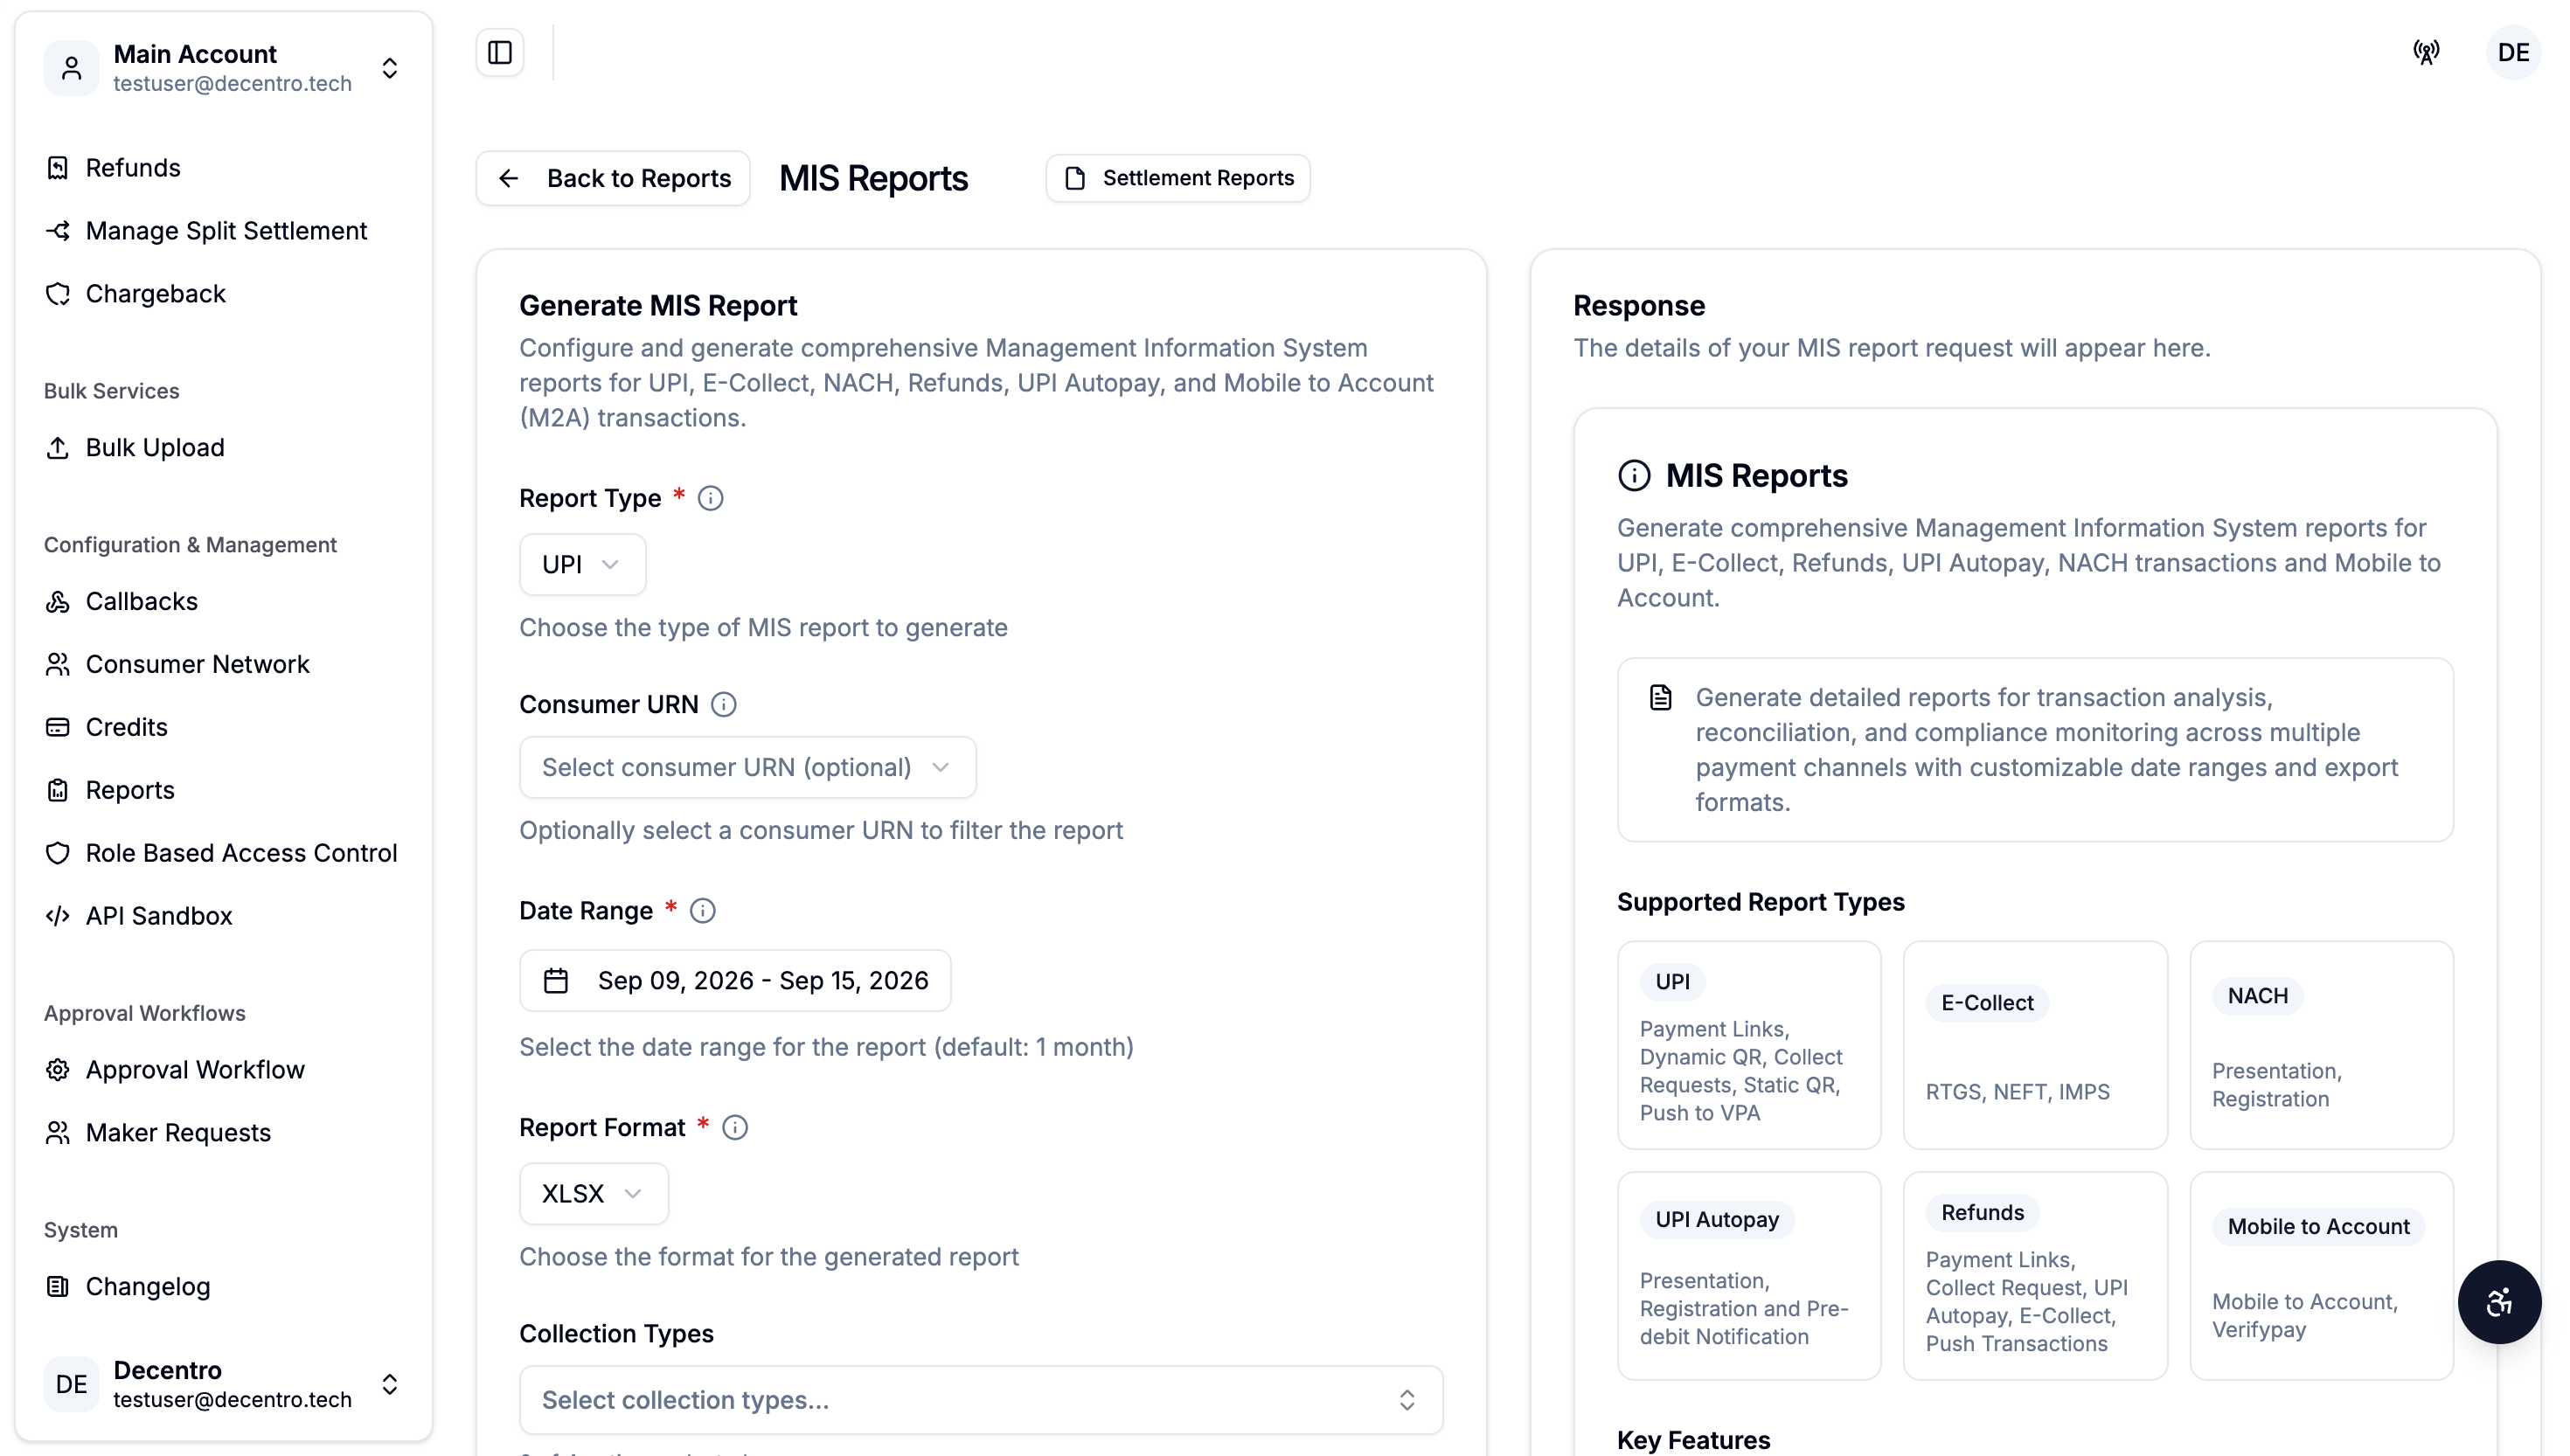
Generate comprehensive, ready-to-use MIS reports across your payment activity:
- Report Type — choose from UPI, E-Collect, NACH, UPI Autopay, Refunds, or Mobile to Account (MCA)
- Consumer URN (optional) — narrow the report to a specific consumer
- Date Range — set the period you want the report to cover
- Report Format — choose your preferred file format (e.g. XLSX)
- Collection Types — filter to specific collection types within the chosen report
- Email Address(es) — enter one or more addresses to receive the report (press Enter after each to add multiple)
Settlement Reports
Generate a focused view of your settlements for easy reconciliation:
- Date Range — set the period you want to report on
- Report Type — choose from UPI Collect, E-Collect, NACH, or UPI Autopay
- Channel Type and Consumer URN — narrow the report to a specific channel or consumer
- Settlement Status — filter by settlement outcome
Updated about 1 month ago